.jpg)
You will need:
piece of salvaged wood
upholstery tacks or short nails (optional)
hammer
acrylic paint (background color)
black acrylic paint (or other color to fill in letters)
large paint brush
small paint brush
ink jet printer
twine
Sharpie Marker or other dull, rounded tool
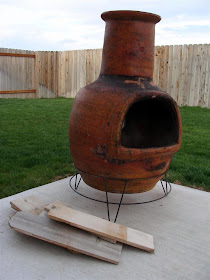
This project started with a pile of cedar fence pieces that we've had sitting in our backyard for ages. My husband had just loaded a good portion of them into our chiminea to be burned when I got the idea for these signs and was able to save them from becoming ash.
.jpg)
I loved how grey and weathered they had become from sitting outside. Start by lightly sanding your piece of wood if it's too rough, or just wiping it off to remove any dirt or other loose particles.
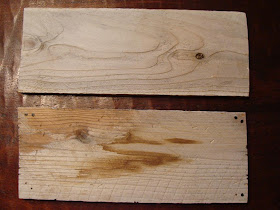
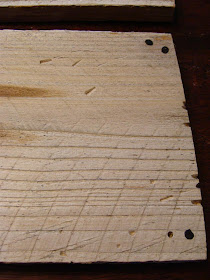
Next, distress the wood to your liking. I hammered a few upholstery tacks into the corners, added a couple of empty nail holes then banged on it with the claw of my hammer. In the photo below the top piece is untouched and the bottom one has been beaten. Poor thing.
.jpg)
.jpg)
Next, choose your paint. Most home improvement stores sell miss-tinted paints for very cheap, so during one of my visits to the Home Depot I picked up this little sample pot of pretty blueish gray paint for .50. Sweet! After experimenting with different paints while makig these signs, I've found that the less sheen the paint has, the better. Cheap acrylic craft paint works best, flat latex paint like the kind I used here is next best. DON'T bother with spray paint- your letters won't transfer well at all.
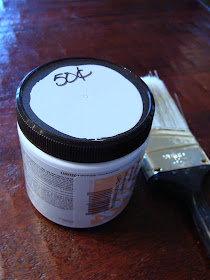.jpg)
(I wasn't really sure if I was going to be doing a tutorial for this or not until I was finished, so I'm afraid I'm missing a few photos for some of the steps. Don't worry. It will make sense anyway.)
After you've properly dented and nicked your piece of wood to perfection and added your tacks or nails, take your large , dry paint brush and get a little paint on it. Wipe off any excess on the lip of your paint can and sweep your paint lightly over the wood. You're not going for a perfect paint job here. In fact, you want it to be as imperfect as possible without it looking like you were trying to make it imperfect, if that makes any sense. And don't bother painting the sides, just the front.
Once you're happy with the paint, put the wood aside to dry and head to your computer. Choose a word and a font that you want on your sign and enlarge it to a size that will fit on the piece of wood that you have. Flip it so it's backwards and print.
I used Adobe Photoshop to print my backwards words using the "Rotate Canvas" feature under Image, then clicking on "Flip Horizontal". If you're using another software program like Microsoft Word, it might be a little trickier. Check the already submitted comments to see if you can find something that works, or check out this link that I found that explains how to either flip the text using your printer's functions, or in Word itself. It seems like kind of an involved process, but I tried it with my older version of Word and it worked.
Go back to your wood and rinse the paintbrush you just used, but don't worry about getting the brush dry.
Turn your piece of paper over so that the ink is face down on your wood, position it so that it's centered (I like to crease the bottom of my paper along the edge of the wood so it doesn't move around) and begin brushing the paper with your wet paintbrush.
You don't want to make your paper sopping wet or the ink will just run and the paper will disintegrate. Just wet it enough so that it seeps through to the other side and starts to release the ink from the paper.
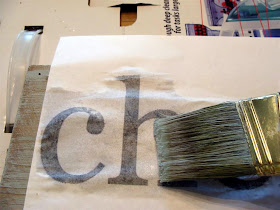.jpg)
Take your Sharpie lid and begin to burnish your letters going horizontally and vertically. You want to transfer as much of the ink from the paper to the wood as you can. Don't peek, though. You don't want to accidentally shift your paper. Just scribble over each letter being sure you've burnished over every bit of each one.
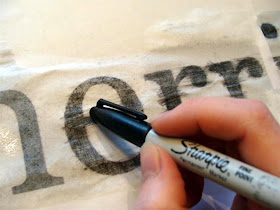.jpg)
Here's what it should look like when you're done. You could leave it like this if you want it to be really faded looking, or...
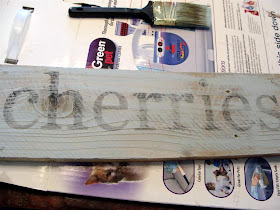.jpg)
... you can go back with your small paint brush and fill in the letters a little with some very, very diluted black paint.
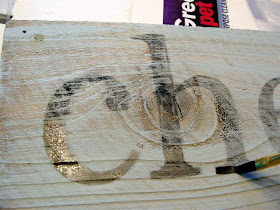.jpg)
Once you've finished with the word, distress the sign a little more with some sandpaper, taking off some of the paint along the edges and swiping it over the word a bit to make it look more aged and authentic.
Finally, nail or staple twine to the back of your wood to act as a hanger for your new, old-looking sign.
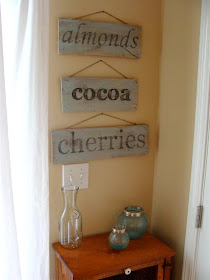
I used some of my favorite foods for the signs I made for my kitchen and I just adore them. The "cocoa" sign was the very first one I did, and as you can see I was more deliberate when filling in the letters with paint than I was with the others. I like the faded look of the other ones more, so I'll go back and sand it a little so that it matches them better.
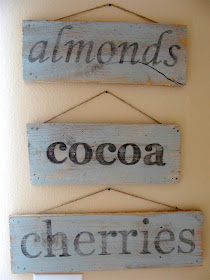.jpg)
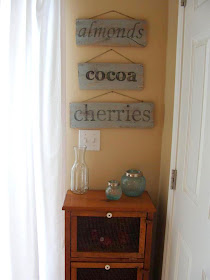.jpg)
Here are a couple more signs that need their twine hangers nailed on before they make the trip to the consignment store. I plan on making several more using other colors of paint and maybe even other colors of ink! Wouldn't it be cute to have a little white-washed board with the word "apples" painted on it in red? I haven't tried using other colors of ink yet, but I don't know why it wouldn't work just as well as the black.
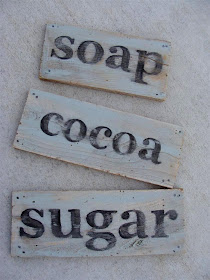.jpg)
Don't limit yourself to food items when thinking of words to put on these signs. You could hang these above a bedroom door and paint the child's name on them, or your favorite inspirational word or scripture reference, or a simple word like "family" or "home" or "welcome". There's really no limit to where these could go in your house. I might just have to make another "soap" one for my laundry room.
One final added note: these signs can be made for outdoor use! Just brush, wipe or spray with a polyurethane finish to seal and protect them from the elements.
Anyway, I hope you enjoyed the tutorial, and that you can salvage some wood to create a custom sign for your home!
P.S. I'm linking to Frugal Friday on

EDIT: I apologize for taking so long to answer this question, but a few of you have wondered if an ink jet printer or a laser printer is required. I have a cheap old ink jet, which is what I used for this project. I have no idea if a laser printer would produce an image that would transfer using this method. Anyone tried it?

Very cute! I think maybe I'll make some for the laundry room or bathroom. Thanks for the idea!
ReplyDeleteJust catching up on your craft blog again--TOO CUTE!! I had a thought for a set (and you may have already thought of this): LIVE, LAUGH, LOVE
ReplyDeleteI wonder if anyone would mind if I yank a board or two out of our back fence--afterall, the snowplow nearly knocked the whole thing over this winter anyway...
Mom
Oh Sarah! You make things look SO easy when they aren't for people that are craft-challenged like me! SUPER cute idea! I love them. I think Trav has some scraps like that from our fence in the garage I am going to use. Thanks for sharing!
ReplyDeleteHi!
ReplyDeleteSuch a great idea...I was wondering though if it matters what sort of printer ink you have in the printer for this to work? Would you happen to know? Thanks!
AMAZING! I have featured your project on my blog! Check it out!
ReplyDeletehttp://madeitorboughtit.blogspot.com
Love your technique for transferring the letters! Brilliant! I have to add this to my "projects" list.
ReplyDeleteThank you so much for this tutorial! I am going to use it to put some script on a piece of furniture.
ReplyDeleteI love your signs!
Saw you on pinterest! I am so doing this!! and proud to be your newest follower
ReplyDeleteoh my gosh! THANK YOU! I tried doing one of those hand painted signs where you trace the printed word with a pen so that it indents the wood and then you try to painfully fill in every word...it was WAY harder than it looked! I am TOTALLY going to try this though!!!
ReplyDeleteThat's so cute and very simple! Love that, it looks amazing.
ReplyDeleteAwesome tutorial! How cool are these!!
ReplyDeleteI love this! So simple, so quick. Thanks! Lisa~
ReplyDeleteFound your site through your Pinterest photo and this project- love this idea! Thanks for sharing it! MIchelle @ a happyheartblog :)
ReplyDeleteAmazing tip! THANK YOU!
ReplyDeleteDoes the background paint have to be a certain type? Or can I use acrylic, too?
ReplyDeleteHow did you print your letters to be backwards? If you just type, print, and flip ink-side down, what you transfer will be backwards. Please help! Can't wait to try!
ReplyDeletethank you for this amazing idea! I've been dying to make subway art but don't have a cricut...i think I'll try it using this method! Found you on pinterest, following now!!
ReplyDeleteGreat idea! Thanks for sharing the tutorial =)
ReplyDelete-caroline @ c.w.frosting
what a great little tutorial..thanks so much for sharing..i found it on Pinterest...
ReplyDeleteHi Sarah, this post is amazng. I love it!
ReplyDeleteI would like to know, the print is ink or laser print?
tnks & hugs
VirBrandi
www.estantedeideias.com
I just found this tutorial on Pintrest and LOVE IT! Thanks so much for sharing...I have tons of scrap wood tht this would be perfect for!
ReplyDeleteWhat a great, simple idea; I cannot wait to try it. Like everyone else I have tried different methods when making my signs, but this looks easy peasy. You are a doll for sharing this with us.
ReplyDeleteI am going to put a link on my sidebar to this tute, I hope that you don't mind.
Hugs, Trudy
Great sign. Curious did you use an ink jet printer and what kind of paper did you use?
ReplyDeleteHOW DO YOU PRINT BACKWARDS!?!??!?!??!??!
ReplyDeleteWondering the same question as above about printing backwards. Glad it wasn't just me lol. Thanks for the tutorial
ReplyDeleteHi there, not sure if this question has been answered: which font did you use? Great tutorial, thanks!
ReplyDeleteLove this and can't wait to try it!!
ReplyDeleteFor those asking how to print your words backwards - you click on File, then Print, then click Properties, Page Layout, and check the box next to Mirror Image. At least that's how I did it, and I have Microsoft Works (not Word), but I would think it'd be the same.
Love this idea, for so long I have been using transfer paper in between the paper and board and this is a great idea and makes it so much easier!! Thanks for sharing!
ReplyDeletethis is so great. i am going to try to teach this to an art class I am doing starting soon!
ReplyDeleteI am in love! Thank you! Thank you! Thank you!
ReplyDeleteFound this on Pinterest - LOVE it!
ReplyDeletethanks for sharing! Tracy
I love this! Did you use a laser or ink jet printer? I have an ink jet, think it will work?
ReplyDeleteThanks
Lorrie
You do the same in word, select mirror image. I am also wondering, will ink jet printers work? I tried doing the nail polish thing (transferring digital paper design on top of polish) with an ink jet and it didn't work. I want this to work, if not I think I need to save up for a laser printer!
ReplyDeleteOkay now that the mirroring question has been answered another quick question how do you get a font size bigger than say 72? Thanks
ReplyDeleteMommy of the cutest twins...you can change your font size by simply typing the number in the font size box. Don't rely on just the sizes in drop down box - highlight the number that is in there and type any other number you want. I use Microsoft Word 2003 and it works just fine like that.
ReplyDeleteAlso, did anyone find out if we needed a laser or an ink jet printer for this?
This is so cute!! I'm going to share :)
How did you get the words fto print backwards? I have micro soft word 2003 and am tecnically challenged, so step by step would be fabulous. Thank you! mkate414@hotmail.com Merri Kate
DeleteCute and great tip for transferring the letters onto your project. I still have yet to take my Silhouette out of the box. I keep picking "old school" over modern technology. (Mainly because anything with tech in it scares me!)
ReplyDeleteQUESTIONS!!
ReplyDeleteLove this BUT.. how do you get your text backwards? Some lady said to mirror image it but I must need a tutorial on that because I can't get it to work. Thanks for your help.. midway in the midst of the project and am stuck :(
Thanks
For those wondering how to print backwards, check the post again for an edit I wrote today with a link instructing how to do this using Microsoft Word. Hope it's helpful!
ReplyDeleteI will be trying this for sure. Great Idea. I just joined your blog. Visit me at root-cellar.blogspot.com.
ReplyDeleteLove this idea. You have probably already sanded the cocoa, but I love that it is darker. Who doesn't like to highlight Chocolate!!! Couldn't you fill in the words with with sharpie instead of painting the letters after. Just a thought. I have more control with a sharpie then I do with a paintbrush.
ReplyDeleteOh my goodness! I just found you through a pin from a good friend on Pinterest! LOVE this!!! I actually have a post going up on my blog tomorrow about how I am absolutely NOT a stenciling kind of person. This is a perfect alternative. I'm also hosting a $75 giveaway at the moment if you may be interested. Either way, Thank You!!! :-)
ReplyDeleteI tried this with the Laser Jet and it did not work. :( Trying to find a different printer type.
ReplyDeleteIf you have a laser printer Citra Solv (found at whole foods) will do the same thing. Nice to know that with ink jet printers water works!
ReplyDeleteLaser printer doesn't work :(
ReplyDeleteto flip in word you have to do it in word art
http://support.microsoft.com/kb/189940
Mommy of the CUTEST twins in the world, you can get a font size biger than 72 by highlighting that font size (72 in this casae) and typing in the size that you desire.
ReplyDeleteFound this post via a Pininterest post on a board. LOVE this..so simple. Thanks!
ReplyDeleteWhat a cute project! I'm glad I can finally do something with those broken fence pickets. They are all old and grey, and they have rust running down from the nails. I think they would make great signs! I bet you could even hook several together and put the words across them. I can't wait to try this!
ReplyDeleteIf I want to paint the wood black, would white letters work?
ReplyDeleteClick PRINT.
ReplyDeleteSelect PROPERTIES
Click the PRINT LAYOUT tab.
Put a check mark in the MIRROR IMAGE box.
In Word it is a printer function.
Hope this helps.
Click PRINT.
ReplyDeleteSelect PROPERTIES
Click the PRINT LAYOUT tab.
Put a check mark in the MIRROR IMAGE box.
In Word it is a printer function.
Just found your tutorial via Pinterest. Your signs are gorgeous! I just love typography.
ReplyDeleteThanks so much for sharing.
Great tutorial I will try this sometime. I also found you from Pinterest.
ReplyDeleteKandi x
I love this project! What an inventive concept! I featured your project on my blog for my Repin Wednesdays series. http://therusticalley.blogspot.com/2011/10/repin-wednesdaysdiy-projects.html
ReplyDeleteJust did a "laundry 15cents" sign for my laundry room! Thanks for the tut!
ReplyDeleteThe version of Word 2010 I have is the "Starter" version; it's missing a few things, and I can't find a way to flip the text in it.
ReplyDeleteBUT ... the version of Paint that came with my computer DOES flip text, so if you get stuck with Word, try Paint! (All Windows computers have some version of Paint, and I'm using Windows 7.)
OK, just tried this. First time I tried it, it didn't work ... but then my printer is set for "draft" which looks fine on paper but didn't seem to have enough ink to transfer. Second time I did it on the regular setting and it did transfer though it is still lighter than I would prefer (and I love the faded sort of look!). So I think it will work better on a white/cream or other very light colored background. I'll try another one in a bit.
ReplyDeleteMeanwhile, I got out my rubber stamps (I collect rubber stamp alphabets because I love playing with words!). Also got out a new *permanent* stamp pad I'd just bought and used it. Practiced the word on paper first so I was confident the letters would line up right and then marked a chalkline on my wood so I had a base line to line up the stamps with and stamped away! This is blackblackblack!! When it's good and dry, I'm going to try sanding it to see if I can get a worn look. So anyway, I love the idea, and it's certainly great for anyone who doesn't have rubber stamps in the size they need, but I think I may stick with stamps myself. :-)
To Anonymous: I am sure she knows how to spell Chimney. However, those little fireplaces in the back yard are called chimineas...
ReplyDeleteI love salvaged wood and this is a great easy project for it! Hoping to help with some of the transfer questions...
ReplyDeleteIf you are transferring with water, you should use an inkjet printer. Laser is a dry printing process, which is why the colors don't bleed when you spill something on the paper. You can supposedly transfer from a laser print using acetone, but personally I've never had much success with it.
I've been using a different method to transfer images to wood, but to print backward try this: Click PRINT. Go to your set up or preferences drop down menu. Click on paper type. Choose T SHIRT TRANSFER.
ReplyDeleteUse regular paper, but this will automatically print it in reverse. No need to flip and alter the original picture. :)
ok, what if your word is long, such as "strawberries?" that won't fit on one sheet of printer paper. so would you buy a different kind/length of paper for that or just have it print on two different sheets and then line it up on the wood?
ReplyDeletethanks!
The easiest thing to do would be to print the word(s) on 2 pages. You could tape the pages together as long as you don't put any tape on the back of the lettering (the ink has to get wet to transfer!).
ReplyDeleteYes, those who are recommending acetone for the laser print are correct. You can buy a can of acetone at any hardware store such as Builder's Square and it is cheap. You will have ventilation issues and a need to protect your skin. Same process as above just use the acetone instead. Nail polish remover works but the acetone is very diluted. The easiest and best method is to use a Chartpack (brand name) colorless blender as it has just the right amount of acetone to melt the laser toner and you are simultaneously burnishing. Depending on the surface it works better than the water/inkjet method and is waterproof too.
ReplyDeleteAlso, if you want to do this with the acetone method and don't have a laser print (almost all desktop printers are inkjet) - then just xerox the image you want to transfer - standard copiers use the same toner that laser printers do. You just have to remelt the toner - laser and xerox style copiers use heat you are melting the toner chemically.
ReplyDeletei just finished this project- success! to answer some of the questions:
ReplyDelete- i got my text backwards by using WordArt and then selecting "flip horizontally"
- i initially tried using red ink and absolutely nothing transferred... idk if it was user error though. i ended up using black but it transferred extremely faint, so i just lightly painted one coat of red over it.
the end result was great! since the red coat was really thin, a bit of grayish/black showed through adding to the worn-effect. THANKS!! :)
Repinned this on Pinterest!
ReplyDeleteThank you for the tutorial - this is the first time on your site. Looking forward to looking around at the other projects you've done.
Not sure if any one else has said this but you can also use acrylic gel medium to transfer the image if you don't want to use a background color.
ReplyDeleteif you have Microsoft Paint then just type the work in. select it and then just Flip Horizontal. you'll get your mirrored image.
ReplyDeleteFound this tutorial on Pinterest, and finally tried it!
ReplyDeleteFlipping the text took some trial & error but...
Using Microsoft 2008, on a macbook, go to file...print... the drop-down for copies&pages has a layout option...flip horizontally...print. I have an HPphotosmart...not a techie so I don't know if that's a laser or inkjet... but IT WORKS. Let me just hamster-out this one mile on the treadmill out of the way and my desk sign will be work-ready!
Laser printer doesn't work- I tried it last night. Thankfully I have a cheap ole inkjet I will try later today!
ReplyDeleteAnyone have a Mac? I had trouble getting a large enough font & printing in mirror image. I have Neo Office. Help?!?
ReplyDeleteTo print backward in word
ReplyDeleteFile, print, properties, advanced, click on the square with 2 letter A's on it (drag your mouse over it and it will say page setting) click mirror print. :) I have Microsoft office word 2003. Worked perfectly, now to find wood!
I'm wondering about sealing this after you're done with everything- would the ink run on the board if it got wet without sealing it? If it was sealed, what would be recommended to avoid it smearing potentially? Thanks :)
ReplyDeleteI use mod podge to seal
DeleteThe problem with all these directions for flipping your texts is that everyone has different printers. The print properties that come up for you will be totally different form the ones that come up for me because you may have a Dell printer, I have an Epson, someone else may have a Lexmark or an HP. There is free image manipulation software called G.I.M.P. that you can download here: http://www.gimp.org/downloads/ --there may be one for Mac and a different one for Windows, just click on the "See more downloads" link. This software works a lot like Photoshop and you can do many cool things with it, including reverse your images.
ReplyDeleteHave fun with it!
Can't wait to try it, Thanks for sharing!!
ReplyDeleteFor anyone with a Mac and no Adobe products here is one way you can do it. Open TextEdit. Make the window as large as your screen will hold. Type in the word you want to print and change the font size so it fills the page/screen. Take a screen shot (command+shift+4) and drag it around the word. The file will show up on your desktop. Open it in Preview. Go to Tools/Flip Horizontal. Print from Preview. It has to be an image not text for Preview to flip it.
ReplyDeleteGreat tutoria!
This is exactly what I was looking for .. I want to make a "let's bake" sign for my kitchen to hang over my flower and sugar jars ... Thanks so much for posting ...I'll post a picture of mine as soon as I make one ...Hugz ..Betty
ReplyDeletePS ..I found you on Pinterest. ♥
Thanks so much for sharing this technique. I found it on pinterest and I think it is the greatest thing since sliced bread! I prefer a woodburner to a paintbrush so I tried this on bare wood last night and it also works like a charm. Boy at the time I could have saved all these years. Thanks again!
ReplyDeletethanks so much for the tips...i LOVE thesesigns and ihave arthritis so holding a brush steady is just not possible. Igotta try this out!!!
ReplyDeleteLove this idea!! Sadly, I also have a laser printer. However, I am thinking if your print the word out and then trace the letters with a sharpie or black pen it might still transfer! I am going to try and I ll let you know if that works!
ReplyDeleteWhat a cool and easy and not expensive idea LOVE IT thank you for sharing
ReplyDeleteSO easy to do!! I found you on pinterest and just tried doing letters on blocks this way.
ReplyDeleteI have Snagit and I snagged my word from Word and was able to flip it horizonally VERY VERY easily. Thanks for posting this!!
Staples or Office Max or any of those places can make a mirror copy of your words. Just print it out at home and hand it to them and for less than 25 cents you got your mirror image!
ReplyDeleteThanks for the tutorial. I found that it works even better if you don't wet the paper and just rub the sharpie over the dry wording. I never would have thought of either though without your blog. Thanks!
ReplyDeleteI found you on pinterest too! thank you so much for this tutorial because I was in need of a last minute gift and this will be absolutely perfect!!!
ReplyDeleteI love this idea!!! I pinned the idea. I'd love to make a tiny sign for above our bedroom door that says "lovers". I'm thinking white board, red-ish letters. I'll let you know when I find some wood and get around to making it.
ReplyDeleteThanks for the tutorial!!
well i like the signs the way they are w/ the darker word in the middle. but either way is awesome. <3 thanks for the tips
ReplyDeleteThanks for sharing your idea....very cute! Only ink jet printer will work for this...laser jet is water resistant ink....I know this from making some flers for our lost dog, some on an ink jet and some on a laser printer...when it rained, the laser printed flyers did not run, however the ink jet printed flyers did.
ReplyDeleteI have a question...do you print the word out on regular computer paper or is there a specific type??
ReplyDeleteThis comment has been removed by the author.
ReplyDeleteGreat idea!!!
ReplyDeleteToday was the day I completed this project! Yay, it looks really good. I have this free word type program called Open Office and even with this not so great program I was able to use my Dell printer program to make a mirror image print out. My tip is to try using your printer program. :) I used multiuse paper and I had the problem of the paper coming off as I burnished. (maybe too much water) anyways, I just sanded or scraped off the paper then painted.
ReplyDeleteAh, finally. Half way through the project I too could not find anywhere in Microsoft Word 2010 for a reverse or mirror image print. I figured it out by "google" . So, here is the link that tells 2010 Word users what to do. Hope everyone finds help here. Good luck.
ReplyDeletehttp://office.microsoft.com/en-us/excel-help/find-wordart-tools-HA010355856.aspx?CTT=1
On Microsoft word 2010, go to Print - properties - features tab - paper type - change to Iron on Transfer - click OK . This will print a mirror image when you print. Don't forget to go back and change yor setting back on the Print screen when you are done. I have HP printer and you could also go to Advanced tab in printer properties to just click Mirror Image - click OK.
Deleteyou can certainly use laser jet (toner) printer... this is called "image transfer" First apply gesso or a gel medium (even Elmer's glue may work but I haven't tried it), place printed paper on it & rub down with back of a spoon or burnisher to remove all air bubbles. Dry several hours (overnight is best), then spritz water and rub damp sponge on paper to remove, peel away or crumble till gone... image is revealed and part of underlying substrate! the more "flush" the surface is the less gaps or distressed look you will get. Xerox copy works well, too because it is also toner, which means it lays ontop of paper and is not absorbed into it the way inkjet is.
ReplyDeleteThank you so much for the tut it looks like fun and I just love the vintage appeal of this. I repinned it to share with others. Now I need to rummage around to find some old wood ;-)
ReplyDeletei would love to feature your idea on my blog, its terrific, please let me know if this would be ok with you.
ReplyDeleteLauren
What a unique technique, gonna give it a try. I love your choice of Color, going to have to scout the reject paints at the depot now.
ReplyDeletenJust saw this on Pinterest... what a great idea! Would love to use your post as one of my "DIY Monday" tutorials, but wanted to ask if you'd mind (I'm going to just link back to your original post)... Let me know www.party-nv.com
ReplyDeleteYou do not have to use Word Art.
ReplyDeleteIn Word, it depends on the version as to how to flip it.
I have Word for Mac 2011 on my laptop. On this, you design your wording.
Then when you are ready to print you select, FILE, PRINT. You will have a print window. At the top of this window, there are several drop down boxes. One has your printer choice, the second is for setting, and the third - which is where you want to change - you will choose QUALITY AND MEDIA.
In the next window, under MEDIA TYPE, select T-SHIRT TRANSFER. This will automatically print your paper backwards for any type of transfer.
One other trick that works in most versions of WORD: Type our your word in the font desired. Make sure you love it and don't want to make any changes.
Select the entire word.
Click, EDIT, COPY
Then click EDIT, PASTE SPECIAL
Under AS: click PICTURE
This will turn your word into a picture.
Then you can click hopefully in your menu bar there is an icon with an arrow. If you click the arrow you'll see several options, click, FLIP HORIZONTAL
Hope this helps
Ink transfer works best on an inkjet, mostly because it sprays ink on the paper, whereas a laser printer sort of burns it into the paper.
Thank you so much for this tutorial, I love these signs, but refuse to pay dollars for them. I might also try this on metal.
Or you can click FORMAT, PICTURE
It all depends on what version you have, but keep looking under the formatting options and print options. It's much easier to choose a T-shirt transfer printing option than to try to flip it around.
Found your tutorial via Pinterest. I love this idea - thanks so much for sharing!
ReplyDeleteHey Diddle Dumpling!
ReplyDeleteGreat tutorial. It seems to be all the rage and I ready to try it too! I have one question though...what font are you using? I love it and I want to be a copy cat.
Thanks so much
This comment has been removed by the author.
ReplyDeleteVery cute! Thanks for the idea, will def be trying this out very soon!
ReplyDeleteKayla (@http://doublethalove.blogspot.com)
I found your tutorial on Pinterest and was so excited to give it a try while I was trying to create a sign for our laundry room. Let's just say things didn't go quite as I had expected. I have linked your tutorial up in my most recent post.
ReplyDeletehttp://www.thediyvillage.com/2012/02/laundry-sign-tutorial-nailed-it.html
I followed your tutorial today and made a beautiful family sign for my fiance and I! It will be displayed at our wedding... Thank you!
ReplyDeleteQuestion: Do you have to transfer the image fresh off the printer or can you print ahead of time?
ReplyDeleteWhy is my transfer sooooo light on my wood sign? What can I do to make it show up more?
ReplyDeletethis website DOES work... however i found it doesn't work with a laser printer.... IT DOES WORK with a ink jet printer!
ReplyDeleteHI, I found your idea on pinterest! I have been looking for a DIY like this for a long time and I'm so glad someone pinned your page!
ReplyDeleteI'm with Kas about the print I love it and would like to use it for my project.
Also I was wondering if anyone has tried painting their wood black and using white lettering???
I'm hoping to get this done very soon so any feedback would be great!
Thanks a bunch,
Michelle
www.tickledinlovexo.com
My husband and I are trying to figure this out. We did get it to write it backwards but it shoved it all the way over to the right of the page. I was wondering what font you used in the tutitorial? Also, what size font did you end up using? I know if depends on the size of the board. Just curious what you used?? I love it!
ReplyDeleteThis is an adorable idea! I am going to link it on my blog, as well! TOOO CUTE! Can't wait to try it! Check out my blog @ stringtownhome.blogspot.com!
ReplyDeleteLove love love!!! I will be using this technique to make signs and maybe some parts for centerpieces for an upcoming wedding!! What a help you've been!!! Thanks for your wonderful tutorial!!
ReplyDeleteI didn't have any trouble figuring out how to flip my image. But when I tried to go over the letters with diluted paint the paint ran all outside the edges of the image. I'm going to try again without making my paint so thin and making sure my wood is completetly dry after transferring the word. Hopefully will have better luck. Thanks for such a versitile idea!
ReplyDeleteI really want this to work for me.
ReplyDeleteI have done everything everyone had suggested and nothing has worked for me :(
I believe that it is from your printer.
instead of trying to flip horizontally, why can't we just type the word backwards to begin with, then when it is flipped, it will be right? i.e., apple would be typed elppa
ReplyDeleteThis worked like a charm and my sign turned out exactly how I wanted!
ReplyDelete@ Anonymous: Spelling backwards doesn't reverse the direction of the letters. You will need to mirror image the words.
ReplyDeletenow I know what to do with my wood scraps!
ReplyDeleteA laser printer most likely wouldn't work, since laser printers work by adhering a waxy powder to the paper, as opposed to an inkjet, which is a paint-like pigmenting process. Don't know if anyone addressed that....
ReplyDeleteI tried. I failed.
ReplyDeleteI have an ink jet printer and I used acrylic paint on my wood, but the ink didn't transfer at all.
Any suggestions?
I also just tried this with inkjet printer and the ink barely transferred. Any suggestions?
ReplyDeleteHas anyone with a laser printer tried skipping the water part and just running an iron over it? (I don't have time to try it, but I know heat is how it is fused to the paper in the first place and heat is what you do not want to use if you ever get it on your clothes or hands and are trying to clean it off.)
ReplyDeleteThis is the EASIEST method I have seen out there. Nice job explaining it. Can't wait to try it!
ReplyDeleteAll the best,
~ Dana
Love this tutorial! Thank you for sharing. I will have to try this!
ReplyDeleteThis is so great! A friend shared with me this link because I just posted about a transfer option using a little bit of glue ... it eliminates the need to scribble with the sharpie cap and do additional painting ... but it does give it a bit of a sheen when the glue dries. Pros and cons to all options, the biggest pros being nearly free and easy!! http://www.thespacebetweenblog.net/2012/05/21/the-temporary-tattoo-image-transfer-technique/
ReplyDeleteFantastic Idea! Thanks for sharing!
ReplyDeleteJust stopping over to repin this from someone's board on Pinterest. Great tutorial. I have done several different transfer methods but not yours.
ReplyDelete~Bliss~
Just followed your directions to make a sign for a wedding. Thank you!
ReplyDeleteVery cute....was wondering what font you used for this project.
ReplyDeleteThanks,
Theresa j.
This is super cute idea. I have some left over fencing that I wanted to use for signs and I will be giving you method a try. I see that you live in Centeral California. Me too.
ReplyDeleteTraci
You can download a program called GIMP, which is FREE, and flip the text to print backwards. It also does a lot of things photoshop can do.
ReplyDeleteJust made these today. They were really easy and they look great. Thought I'd share that red and brown ink didn't work - only the black. Cost me nothing to make as I used broken up wooden pallets that I found beside the road and paint I had.
ReplyDeleteLove this idea and I'm so glad it works with an ink jet printer! Can't wait to try it.
ReplyDeleteWhat font did you use - it looks great!
Under the items needed list, why does it say "laser" printer instead of ink-jet?
ReplyDeletei tried this last night...i only had latex paint and i thought it was the same thing as acrylic latex but maybe its not.
ReplyDeletei printed my words using a inkjet, then laid the paper on the dried paint and brushed it with water. i found i had to press extremely hard to get even a tiniest bit transferred to the wood, but then the paper would rip.
HELP!!! what am i doing wrong? i am going to try again with some "acrylic" paint. SUGGESTIONS?
This process you use an Inkjet printer. The ink runs when it gets wet. If you have trouble with the transfering of ink, you probably put too much paint on the board and left little porous surface for the ink to absorb into. Remember this is not a solid full transfer. For laser printer transfer to wood, it requires dry heat (very hot) and pressure - basically you are melting the toner and pushing it into the wood. This leaves a very antique look. This also works on cotton fabrics that will tolerate hot temps.
ReplyDeleteReversing your image: If you are not using Photoshop or other graphic software that includes the reverse image feature you may tell your printer in the print menu to do it. You may have to look around for a while once you tell it to print, but before you hit 'print' find the 'properties' or 'advanced' or 'options' features on the print menu - look at all the available options and you should find it there. Most home printers will have this capability regardless of the software you may be using.
Thank you and thank you again. I am always looking for ideas and you Pinterest people are so smart, I just love ya. I am going to give this a go.
ReplyDeleteFANTASTIC I WANT TO TRY!! I'M FROM ITALY AND I ALWAYS LOOK YOUR FANTASTIC IDEAS
ReplyDeleteA LASER PRINTER WILL NOT WORK. THE INK IN LASER PRINTERS IS DRY.
ReplyDeleteYOU MUST USE A INKJET PRINTER WHO'S INK IS ALWAYS WET.
If using a Laser printer, follow the directions, but instead of wetting the paper, press with a hot iron. I have used this technique with other materials, but not wood. Doesn't hurt to try!
ReplyDeleteI just made a sign for my daughter using your tutorial, and it turned out fantastic! She is getting married July 14, so I made a sign that says "Whiting est. July 14, 2012" Her bridal shower is tomorrow, and I can't wait to give this to her. Thanks for the descriptive tutorial... it was really easy!
ReplyDeleteI wish there was a way to pin this on Pinterest! Great idea!!!
ReplyDeleteThe laser printer doesn't do this with water but I've had some luck using freezer paper amd heat {hot iron} to transfer
ReplyDeleteHi, Sarah
ReplyDeleteI'm coming late to the party!
I just found you on pinterest (newbie). TY 4 the GR8 Tutorial.
Best of success,
Gracie
Very cute idea!! Thanks for sharing!
ReplyDeleteWhat a great tut! Thanks! I think I may try letters on wood cubes/blocks for the mantle. What do you think?
ReplyDeleteIt looks like you used an ink-jet printer for this project, but you listed a laser printer under the supply list. This would be worth correcting because if someone tries this method with a laser printer, it will not work.
ReplyDeleteTHis is amazing! I just found this via pinterest! Love your signs! Thank you for the fabulous tutorial!
ReplyDeleteI tried burnishing the letters several times. I have an ink jet. I followed the instructions carefully and my letters are barely showing up. If I press any harder, the paper will rip. Should I burnish it, let it dry like that then re-wet it the letters? I'm trying to think of another way to transfer my letters before I run out of ink. Anyone have any suggestions?
ReplyDeleteHi:
ReplyDeleteWhat a great tutorial and very cute.
I'm posting it on my blog tomorow, hope you don't mind and I'm your latest follower, its so cute and easy. I have an HP printer and Word, hope it works, thank you so much.
Martha
Does anyone know how to use this tutorial to put white letters on a black piece of wood?
ReplyDeleteIm not too sure if this will work....but perhaps you could make your background black and your letters white... then print. Then you can use this process the same way, with white letters. Maybe it will work. Hope so. Good luck.
ReplyDeleteNatalie
I am going to try this! I am glad to see that you used an ink-jet! Great tut!
ReplyDelete~Nancy
How would you seal this for an outside sign so the ink/paint doesn't run? Would love to do a "porch rules" sign.
ReplyDeleteWOW! LOTS of comments! Sorry I haven't been able to reply to all of the questions, but hopefully if you've tried this tutorial you've had some success. I apolotize for the typo in the supplies list. I've corrected it to say "ink jet printer" instead of laser printer. If you've tried this with a laser printer and found that it didn't work, I really do apologize. This works for ink jet printed images/lettering only.
ReplyDeleteI did this! I used the word "Pâtisserie", and wood that came from an old discarded entertainment center. It came out gorgeous and is my favorite piece in our kitchen!
ReplyDeletedoes the paint have to be completely dry?
ReplyDeleteIf you have a laser printer ~ which will not transfer, you can print it out then trace it onto the sign using Saral paper. Saral is available at most hobby or art supply stores either in a roll or packets of sheets. After transferring the outline you would paint the letters then wipe off any visible traces of the saral transfer. BTW, Each Saral sheet can be used multiple times.
ReplyDeleteHi love the idea. I tried them and had a problem with the ink transferring onto the board. I checked and the printer is an ink jet Brother. Any suggestions? I'd love it if you could help.
ReplyDeletejust finished a welcome sign for my front door! turned out great.. i hot glued a few seashells i found on the beach to give it an extra touch. thought it was appropriate since we live at the beach. thanks for the idea!!!
ReplyDeleteWonderful idea! I made several signs for my daughters upcoming wedding and they turned out great!! Thanks so much for the great instructions!! Will use this again!
ReplyDeleteFor those wondering how to flip the text. For me all I had to do was hit print, choose layout from the drop down menu and then check the box that said Flip Horizontally. So simple and turned out great!
ReplyDeleteIf you're using a LaserJet printer, your project can still be successful. Instead of using water to transfer the ink, use rubbing alcohol.
ReplyDeleteWill this work if I do not paint the background first?
ReplyDeleteHi Sarah! haha! How random...one of my friends re-pinned this and it's YOU! Hope you're doing well!
ReplyDeleteI absolutely LOVE this! I've done screenprinted signs in the past, but creating the screen is expensive and a lot of work. I've wanted to do some new ones, and with this method I am motivated! So much easier, and just as nice! Thanks for sharing!
ReplyDeleteIt would be easier to use a sharpie paint pen if you don't want to take the time to paint in the letters :)
ReplyDeleteI love this idea though! Especially with the words printed out on an inkjet printer! Would have never thought of that :)
Will this work or ceramic?
ReplyDeleteJust love this idea. Thanks a bunch for the tutorial. *skips away whistling*
ReplyDeleteFor those with a printer or copier that uses toner instead of ink, the solvent you need is lacquer thinner. You can transfer your printed design to fabric, wood, rubber stencil, painted surfaces, and fill in with whatever color of Sharpie marker you want--or permanent PrismaColor, or embroidery...or whatever. Decorate your canvas shopping bags with quotes. Who knew "going green" was so much fun?!
ReplyDeleteFor those with a printer or copier that uses toner instead of liquid ink, the solvent you need is lacquer thinner. Print your desired design [reverse, if it's type], wet your surface with lacquer thinner, then position your paper over your surface and saturate it with more lacquer thinner [say, on a folded-thick paper towel]. The toner will transfer to your surface.
ReplyDeleteI have used this technique on rubber stencil [for sandblasting glass] and heavily textured fabric [tote bag for shopping] so it seems like the sky's the limit for potential surfaces. Wood, paint, walls, clothes...
Postscript: Lacquer thinner also transfers graphite, as in pencil "lead," not just toner.
This comment has been removed by the author.
ReplyDeleteDo you think this technique would work on fabric?
ReplyDeleteYou can transfer images printed with a laser printer, but it is a different process than this because the ink won't be released by just the water. You can find the process on Pinterest by looking up wood photo transfers.
ReplyDeleteI love this tutorial! Thank you very much!! I pinned it with Pinterest, putting the pictures all together in a same image and I added a link to your blog. I hope you like the idea. This is the pin: http://pinterest.com/pin/94786767128462652/.
ReplyDeleteThank you so much for this idea!! I wanted a "here comes the bride" sign for my wedding and this was perfect and totally inexpensive! And thanks to whoever commented about using rubbing alcohol for laser printers...it worked like a charm!
ReplyDeleteLove It!!!Thank you so much, we live on a farm and have so much wood lying around I always wondered what can I make...now I know..I was thinking of trying on wood from old weather beaten pallets, would that work?
ReplyDeleteThank you for your wonderful tutorial
ReplyDeleteI was having trouble finding a mirror image option for the cheap printer I have. My wonderful boyfriend found this website that will do it for you. http://www.lunapic.com/editor/?action=mirror
ReplyDeleteI used Microsoft Paint and added my text then saved it as an image. I then uploaded it to luna pic and it mirrored it for me and I saved from there.(It was a little smaller then the original image) I then went back and opened the mirrored image in Paint and resized it to how big I needed it.
Hope this helps any of you having trouble as I did!
Hi .. to another Anne-Marie!! Well, you have inspired me to try and make some signage out of some old cedar fence boards that we were going to get rid of! I'm just going to try and paint words on cut sections of the boards, drill holes and hang the boards throughout the yard! Many thanks, another "Anne-Marie" ! :)
ReplyDeleteLoved the tutorial and plan to try it in miniature!
ReplyDeleteFor the lady who wants to try this with white lettering, white is an absence of color in inkjet printers. it won't transfer as white no matter what you try.
As for thinning paint so it doesn't run, you might try gel medium instad of water to thin.
Hi! I love this tutorial & it helped me a lot with the black ink on another color, but I am doing a black sign & tried a tan lettering & it wouldn't transfer:( Do you or anyone else know what would work for a black background? Thanks:)
ReplyDeleteGreat idea, thanks! My husband has just built an outdoor table using some palings off our old fence. I was thinking of a way to 'jazz it up' and this seems perfect. Think I'll go with family names and birthdates...
ReplyDeleteLove it!!!
ReplyDeleteAny finish that I'm aware of that will provide protection will also significantly alter the look of this basically unfinished wood. Waxes or oils will affect it the least, but will also offer little to no protection.
ReplyDeleteLaserJet Printer Toner
Does anyone know if you could use this on canvas?
ReplyDeleteI have done this, and it is do-able, it just takes some trial & error. I'm using old pallet boards, so sanding is required, and I've found that I like to put the letters on a plain wooden background. I've made these with my kids names, other words, phrases,and for the kids teachers. But what I'm having trouble with, is how do you transfer letters onto a dark background? Any help?
ReplyDeleteOkay I tried using paint make your box big then use the type setting of 72 and choose your font from list type and when you finish can flip it horzionally then resize to make bigger. Hope this helps out some. Yes it is a good idea.
ReplyDeletefor the 'reverse-coloring' aficionados...paint your board white... then set your type for a 'white' word and a 'black' background...it will print out the background, which you will actually be transferring...the remaining white paint showing will appear to be the actual 'sign' with white words.... i have just done a "Hershey" sign with old school framework similar to their old style wrappers and it came out really nice on my third try...everything has a learning curve...
ReplyDeleteThanks a bunch for posting this! I saw a sign on Pinterest that I wanted to make for Christmas with all the reindeer's names on it but had no idea how I was going to put their names on the piece of wood! A few tips-I used Microsoft Word but instead of making a textbox I actually used the Wordart option. It was the only way I could figure out how to flip the text. I also used an HP Deskjet printer. It turned out great! Thanks again!
ReplyDeleteChristmas gift worthy?! Yes I think so!
ReplyDeleteBecky channell
girlgirlblc@yahoo.com
For those who can not print backwards you can all so use carbon paper between the wood and paper but then you would have to paint the letter as the carbon would run off.Or take a pencil and rub really dark on the back of the paper the pencil will transfer.
ReplyDeleteFor those that cannot print backwards or find it a hassle try the graphic fairy she has everything and she makes it backwards for you already!
ReplyDeletehttp://graphicsfairy.blogspot.com/
I have been making signs like crazy ever since I got the whole process down pat. However, I was really excited to try my coffee table, but I think my printer is too low on ink for it to transfer. I'm off to get more ink, and try again! I'll try to send you a pic when I'm done!
ReplyDeleteI love this idea, but I am wondering if the wood has to be painted or sanded first for the ink to transfer.
ReplyDeleteI would really like to know what fonts you used for these signs!
ReplyDeleteI might seem weird for aaking this cuz no one else has asked, but I was wondering if it matters if the ink is freshly printed on the paper or how long after u print it do u have to transfer it??
ReplyDeletePLEASE ANSWER!! Lol
If you copy to Paint, you can flip it horizontally.
ReplyDeleteThanks for telling it doesn't work with Laser, so I don't waste my time!