There's a dollar store here in Modesto called Dollar City, and while browsing there the other day I came across these stacked skulls made of some sort of ceramic.
I thought they were cool, but walked out without buying them. But by the time I'd reached my car I had an idea so I went back inside and bought a few.
Wouldn't these make awesome candlesticks? Right there in the store I started hatching my plan of action. When I got home I got to work. Each one had a fairly flat bottom with a small hole in it.
First I (carefully) enlarged the hole...
... so that the rounded head of another skull would fit nicely inside it. Yep- I'm stackin' the stacks!!
Gorilla Glue is a favorite of mine, so I gave the edge of the hole a nice slathering...
... and fitted my stacks together the way I wanted. Painter's tape kept them in place while the glue dried.
The skulls themselves were pretty stable, but seeing as how they'd eventually be holding tall candles (and fire!!) I wanted to be sure they wouldn't easily tip over.
I had a scrap of plywood on hand which I traced some circles onto...
... then cut them out as best I could with my trusty, cheapy jigsaw.
They were pretty rough, but nothing a good sanding wouldn't take care of.
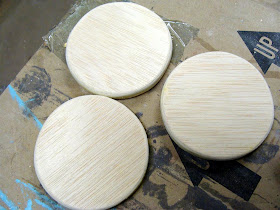
And here are my nice, smooth, finished bases. Granted, I could've gone to the craft store and bought some perfectly round wooden discs that would've worked just as well, but I wasn't in the mood to drive to the other side of town for that. Plus- these were free!
More Gorilla Glue to the base of each stack and on they go to dry.
It took a lot of brainstorming to figure out how I was going to keep the candles in the top of the skull, but finally found that the cap of a craft paint bottle was just about the right size. Again, it was something I had on hand and was FREE.
I bored a hole through the top (this was painstaking and tedious and I had to fix a couple of them when I wasn't careful enough), then inserted the paint cap and applied a LOT of hot glue to keep it in place. A little paint to camouflage the cap and I'm ready to put in my candle!
Now, without further (boring) ado, here's the finished product. I LOVE them!!
As per my husband's suggestion I left some of the skulls the way they were painted already. Then I added some hot glue drips to the top and painted them and the base to match, then dripped a bunch of wax on the top to make it look nice and old and used.
I couldn't resist going black on a couple of them, too. Black is so very Halloween, afterall.
Some gray paint dry-brushed onto the black really brought out the details. I went a little crazy with the drippy wax, but I think it looks cool.
Now, I realize none of you are going to run out to your local dollar store to find some ceramic skulls to turn into candlesticks, but I'm hoping that this post will get you thinking about fun and unique things you can make using inexpensive items that you might come across while you're out and about.
Go ahead- scan that aisle that you never even glance at. You never know what might inspire you!
I'm sharing this project at Skip to My Lou!


Love It! what an awesome idea Sarah.
ReplyDeleteSarah.....Sarah (WAVING HYSTERICALLY) Is there any way to subscribe to your blog other than ATOM? Do you have a way that it can come directly to my yahooo.mail??? oHHHHH Pleaasssse....
ReplyDeleteI love all your stuff and your refinishing....but I keep missing it. Please, please
(sorry for the groveling...I can get excitted!)
Linda
lindavb50208@yahoo.com
These are fabulous!
ReplyDeleteI love that you used a lid for the candle holder itself. Smart idea!
Great job!
Thank you for another essential article. Where else could anyone get that kind of information in such a complete way of writing? I have a presentation incoming week, and I am on the lookout for such information.
ReplyDelete