Monday, December 19, 2011
Teacher Gifts: Button Monogram on Canvas
When I came upon this photo, I knew what our project was going to be. I mean, how stinkin' cute is this framed button monogram?
After searching around town for some inexpensive white frames with mats and coming up empty, I opted to go with plain white canvases instead. I picked up a 2-pack at Hobby Lobby for about $6 (but used my 40% off coupon to get them for even cheaper).
I already had a pretty good stash of buttons, but just in case I also bought a couple of packs of assorted colorful buttons at Joann and some colorful brads at Hobby Lobby.
Using simple, thick fonts, I printed my kids' teachers' initials and used the trusty pencil-on-the-back-of-the-paper technique to trace the outline onto each canvas.
From there the kids and I pretty much followed Jen's tutorial for filling in the letters with buttons, brads and snaps, starting with big buttons first and working our way down to the tiny fillers.
I had them use plain old white glue on each button and they stayed on perfectly once they dried. For the brads, I ended up clipping off the prongs on the back with wire cutters and gluing them on because I didn't want to fool with trying to poke them through the canvas.
Didn't they turn out great? This is my 5-year-old's masterpiece (with some help from Mom with the tiny ones).
And here is my 8-year-old's work of art.
I loved that they did most of the work themselves, and they loved having creative control to choose the shapes, sizes and colors of materials that they wanted to use and configuring them how they saw fit.
And I'm pretty sure their teachers loved them, too!
Wednesday, December 14, 2011
Before and After: Maple Dresser/ Sideboard
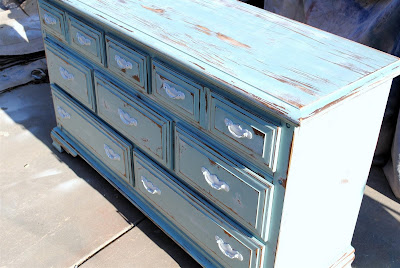
In the end we went with a heavily distressed duck-egg paint job with distressed white hardware. (And please forgive the sloppy Photoshopped background, but I figured that was better than showing you all the crap that was surrounding this thing when I took the picture.)
I just love how the top turned out after I sanded it.
Wouldn't this look so cute in a nursery as a changing table?
Seriously, I do love these kinds of dressers. I've lost track of how many have come in and out of my garage now, but this surely won't be the last one!
Friday, December 9, 2011
A Recycled Wood Sign and More Christmas!
While I was in my hall-decking mood yesterday I leaned an old window up behind my computer monitor and, while I really liked how it looked, the wall above it looked kind of bare. It needed something. Something I didn't have already, so what else was I going to do but make that something?
I poked around in my garage and on the side of my house and discovered these old boards that were once the top of this old writing desk that I turned into my kitchen island.
They were perfectly weathered and beaten up, so I didn't do anything to them except sand the grossness off the backs.
I had these little dealies laying around from another project (I'm not even sure what they're called or what they're really for) and used 3 of them to attach 2 of the boards together in the back.
Then using 2 screws and some heavy wire I made a hanger. Betcha can't guess what I made...
Okay, so maybe it wasn't real hard to guess (especially if you paid any attention to the title of this post). This sign required zero painting- just my trusty old print 'n rub technique that I've used over and over again.
Now that gap between the leaning window and the ceiling doesn't look quite so vacant.
Just for fun, I'll give you a spin around our front room to show you some of the other Christmasy things I've got going on in there.
Happy hall-decking to you all!
Monday, November 28, 2011
Christmas crafting
And today I'm going to give you a closer look.
I've said it before and I'll say it again- I am not terribly original but I can copy just about anything. Most of these projects were inspired by others, so I'll be sharing the links to them so you can try these projects yourself if you want.
These mason jar snow globes are an Anthropologie knock-off.
I made some more this afternoon and considered doing a full tutorial, but they're just so easy it seemed silly. So if you want to make some, here's a mini-tutorial.
You'll need:
mason jar (mine are from Hobby Lobby)
mini fake trees (got mine at Dollar Tree in a 2-pack with one big and one small)
any other little items you want inside, like mini pine cones
fake snow (any craft store)
glitter
hot glue gun and sticks
ribbon or rope to decorate
Hot glue your trees and other knick-knacks to the inside of the lid. While that dries put a little fake snow and some glitter inside the jar. Place some hot glue along the very inside edge of the top of the lid (where the top of the jar will touch once it's screwed on). DON'T put the glue on the threads of the lid. Carefully screw the lid on tight. Tie on some ribbon to decorate it a little further, shake and enjoy!
Moving on...
I really love old sheet music and have collected quite a few vintage hymnals. I found one recently that had the edges of the pages dyed red, which was perfect for these Christmas crafts. I used it to make some ornaments (inspired by Miss Mustard Seed).
And a couple of nice big wreaths.
These book page trees on timber bases look pretty cute clustered together. (Inspiration found here.) Instead of folding every page like the linked tutorial says, I just cute through the pages with an Exacto knife from the top inside corner to the bottom outside corner (or an inch or so in from the corner for a skinnier tree). Each tree also has a skewer glued inside the binding, which fits into a hole that I drilled into the base. That way the trees can be more secure on their bases for display but can come apart for storing.
Here's a closer look at the candles like in the photo above. The possibilities for these are endless! (Tutorial found here.)
Remember my thrifty finds from this post? Here's what I did with them.
These silver pieces were pretty cute as-is, but they got a little polish before going into my space at the store.
Did you know that plain old white toothpaste is a pretty good silver polish? That's what I've used on the last few pieces of really tarnished silver that I've cleaned up and it works great! Just smear it on, let it sit then, wipe it off with a clean, dry cloth.
This artichoke finial just needed a little spruce.
So I painted the base of it a creamy white, glazed and distressed it and then used some Antique Gold Rub 'n Buff on the center designs.
I forgot to take an "after" photo of the gold candlestick in the photo below, but it also got painted creamy white, then glazed and distressed. For now I'm keeping the silver photo holder.
The wooden box got some new rope handles and some lovely French typography on the side. (Oh, and there's that newly polished bud vase next to it!)
The typography was an image from The Graphics Fairy (of course) and I used my tutorial to transfer the image onto the wood.
I have to admit, even after all that Christmas crafting, I'm not really in the Christmas mood yet. It's after Thanksgiving and I have no desire to pull out my Christmas decorations. I hit a thrift store today and found a few boxes of vintage ornaments that prompted the cashier to ask me if I was setting up my tree this weekend. I felt kind of silly when I said no.
Still, I listened to Christmas music on my Pandora station while making snow globes. Hopefully the mood strikes soon! Are you in full-blown Christmas mode yet?
Thursday, November 24, 2011
Tutorial: DIY Vintage Sock Stretchers (Christmas decor!)
Aren't those vintage sock stretchers a-freakin-DORABLE?! Then I recently came across this photo of a child sized pair and decided I just had to try and make some of my own.
I've written up a little tutorial in case you'd like to try this project yourself.
DIY Vintage Sock Stretchers
Supplies:
paper
pencil
scissors
sheet of 1/2" thick MDF or wood
2 C clamps (optional)
jig saw
electric drill
hole saw attachment (1" for child size stretchers, 1.5" for adult size)
electric sander and/or sand paper
paint
sponge brush
ribbon or twine
First, draw your stretcher shapes onto paper to make templates and cut them out. I used my inspiration photos to mimic the shapes I wanted to cut.
If you have clamps, secure your sheet of MDF (what I used) or wood to a tabletop or saw horses to stabilize it while you cut. Let enough of the sheet hang over the edge of the table so you can cut out your shapes without cutting into the table.
Trace your sock shapes onto the wood, fitting them as close together as possible, then cut out with your jig saw.
Mark on your paper templates where you want your large holes to be, then poke small holes in the centers with your pencil and transfer these small marks onto each piece.
Here's a picture of the kind of hole cutting attachment you'll want to buy for your drill. You can buy them in individual sizes, or as sets. I bought a set of 4 from Home Depot for about $13. Just make sure the kind you buy is meant to be used on wood.
Using your small pencil marks as your guide, cut out each hole.
I found that if I cut about halfway through on one side, then flipped the piece over and came through from the other side, I got much neater results. The drill bit that's part of the mandrel will poke through the other side before the hole cutter does, so when you flip the piece over you can just place the drill bit right into that hole so you're cutting in the right place. (Hope that made sense.)
Next, smooth out the edges and the insides of the holes using a hand sander and/or sand paper. I used an electric sander for the outside edges then just folded a piece of sandpaper and curled it up to fit inside the holes and did that part by hand.
Now you're ready to paint!
I just used regular acrylic craft paint and a sponge brush, but you could also use spray paint if you wanted.
I did a pretty messy job, but I knew I'd be distressing them quite a bit later so I didn't care.
Once your paint is dry you can distress the sock stretchers as much or as little as you want. You could also use a little stain or glaze to antique them even further.
I also wiped mine with a little bit of polyurethane, but this isn't absolutely necessary.
When you're done, thread some ribbon or twine through the top hole (or drill a smaller hole closer to the top if necessary) to use for hanging. Here are a few of my finished ones.
This one is hung with a strip of cotton fabric that I tore off then frayed the edges.
They're not genuine vintage sock stretchers, but can you really tell the difference? Let me know if you give this project a try- I'd love to see the results!
Wouldn't these be cute as everyday decor? I really want to make a few wood ones and leave them natural. Or how about using those itty bitty ones in a nursery? *gasp! So sweet. But I really love the idea of using them as Christmas decorations.
Now if only I had a fireplace to hang some of these from...