Friday, October 28, 2011
Before and After: Another long dresser
This french beauty was a great deal that I found on Craigslist.
The drawers are pretty and curvy, but the hardware it came with was a little too ornate and one of the handles was broken.
I loved that the top wasn't painted, though it was in pretty rough shape.
I had recently been looking back over my blog and came across this post about the dresser I was so excited to paint with my custom robin's egg blue and decided I'd do a similar treatment to this one.
I started by stripping the old finish off the top (always a very satisfying, if messy, job) and sanding off some of the imperfections. Then the body and drawers got painted with that lovely blue (with no primer this time).
I chose to leave the top unstained and just sealed it with wipe-on poly so that the natural wood color would show and the remaining imperfections could still be visible (though the wood isn't quite so yellow in person). I was going for a very rustic look here.
The body and drawers got a heavy distressing, then glazed brown.
These long handles came off of another dresser that's waiting to be worked on. I thought they were in the perfect state of weathered wear to go on this particular piece.
The row of center drawers got some smoked glass knobs from (our BRAND NEW!) Hobby Lobby.
I love how the original paint color shows through on this piece, but that the new blue is really the star now. It's currently in the shop, so if you're close by go have a look!
Friday, October 14, 2011
Before and After: Dresser and Side Table
I was going to try to reattach it but soon realized I just wasn't up for a job that time consuming at the moment.
It also had this awful water spot right on top.
Using a damp towel, a hot iron and a putty knife I was able to get all of the veneer off the drawers in about 40 minutes.
This dresser was the perfect candidate for a treatment I've been wanting to do for a while. First I cut out some numbers using a roll of contact paper that I usually use to line drawers...
... and rubbed them on real good.
Then I used a gray glaze on the drawers and when I peeled the contact paper off it left the wood numbers behind. I was so happy with how clean and crisp the lines were. No seepage or leaking at all! The drawers also got a little antiquing with some stain.
The original hardware wasn't too bad, so I buffed each pull with fine steel wool and later primed and painted them with oil rubbed bronze spray paint.
Here it is all done. In the end I glazed the top as well to hide that water spot. I re-stained the top, sides and spaces between the drawers, but the spot was still really noticeable. I would have liked to leave the top wood, but it had to be done.
I think I started sanding the top of this table before I remembered to take a photo, but to begin with it was in pretty rough shape.
Because of some water damage that swelled the wood, I had to sand down past the wood veneer and into the pressboard underneath in a couple of places. A little wood putty to smooth it out helped a lot.
It got painted a pretty blue (surprise, surprise right?) then distressed and antiqued with brown glaze.
This is one HEAVY table. I just love those legs!
And just for fun, here's one more little bit of Halloween decor that I did the other day. I FINALLY switched out my framed scrapbook paper with the spooky prints I found at The Graphics Fairy last year, and put up a flock of black cardstock bats.
I think I need a few more bats. You can never have too many bats around, right? :)
Saturday, October 8, 2011
A little more Fall decor
Recently I came across this darling leaf-covered initial project from The Thrifty Abode and decided to make one for myself. Little did I know how difficult finding a large paper mache H would be...
So I made my own using this tutorial from Me Like Stuff. I just used some cereal and cracker boxes because I had them on hand and they're the perfect stiffness for this kind of thing. I sprayed the whole letter with white primer when it was dry so the newsprint wouldn't show, but looking back it would've been smarter to paint it yellow or orange because later I had to go in and paint the little white spots that peeked through my leaves. The leaves were something I'd picked up a few years ago at Michael's but for the life of me can't find natural leaves anywhere now.
It hangs by some ribbon inside an empty yard sale frame next to my front door and I kind of love it.
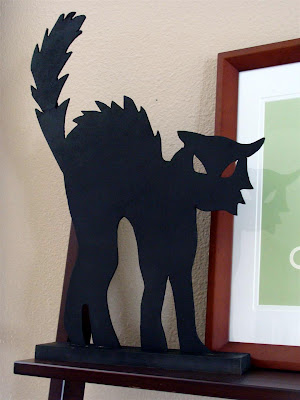
This next project is another knock-off, though I didn't have a tutorial to follow so I just winged it. My friend has this adorable wooden cat silhouette standing on her sideboard and I wanted to try making one of my own. All I had was a piece of thin MDF, so I found an image of a spooky cat online and drew it onto my board.
It was pretty tricky with all the little ins and outs, but my jigsaw and I finally got it cut, then I used a box cutter for the eyes. Sandpaper smoothed out the edges, and some primer and flat black spray paint finished it off. I cut a slit in a piece of wood so the feet just slide in and my kitty can stand up.
My friend's is way cooler, but I'm happy with how mine turned out. Wouldn't he look cute standing in a window?
Finally, I've at last replaced my blue spring/summer pillows with some more fallish ones in the living room. This color scheme from design seeds was my inspiration this year.
The long green one in the middle was a Home Goods purchase, then I bought some linen from fabric.com and sewed up some simple envelope-style covers for a couple of feather inserts that I'd gotten at a thrift store.
The orange is pretty bright, but I don't mind. It adds a punch to those other muted colors. Still got some more decorating to do, but things are coming along. Have you gotten your Halloween and fall decor out yet?
Saturday, October 1, 2011
Stacked Skulls Candle Sticks
There's a dollar store here in Modesto called Dollar City, and while browsing there the other day I came across these stacked skulls made of some sort of ceramic.
I thought they were cool, but walked out without buying them. But by the time I'd reached my car I had an idea so I went back inside and bought a few.
Wouldn't these make awesome candlesticks? Right there in the store I started hatching my plan of action. When I got home I got to work. Each one had a fairly flat bottom with a small hole in it.
First I (carefully) enlarged the hole...
... so that the rounded head of another skull would fit nicely inside it. Yep- I'm stackin' the stacks!!
Gorilla Glue is a favorite of mine, so I gave the edge of the hole a nice slathering...
... and fitted my stacks together the way I wanted. Painter's tape kept them in place while the glue dried.
The skulls themselves were pretty stable, but seeing as how they'd eventually be holding tall candles (and fire!!) I wanted to be sure they wouldn't easily tip over.
I had a scrap of plywood on hand which I traced some circles onto...
... then cut them out as best I could with my trusty, cheapy jigsaw.
They were pretty rough, but nothing a good sanding wouldn't take care of.
And here are my nice, smooth, finished bases. Granted, I could've gone to the craft store and bought some perfectly round wooden discs that would've worked just as well, but I wasn't in the mood to drive to the other side of town for that. Plus- these were free!
More Gorilla Glue to the base of each stack and on they go to dry.
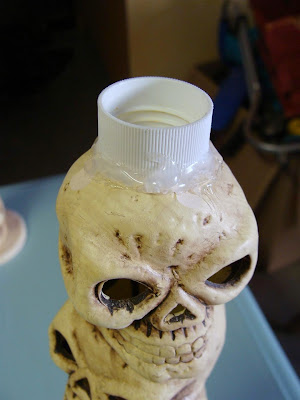
It took a lot of brainstorming to figure out how I was going to keep the candles in the top of the skull, but finally found that the cap of a craft paint bottle was just about the right size. Again, it was something I had on hand and was FREE.
I bored a hole through the top (this was painstaking and tedious and I had to fix a couple of them when I wasn't careful enough), then inserted the paint cap and applied a LOT of hot glue to keep it in place. A little paint to camouflage the cap and I'm ready to put in my candle!
Now, without further (boring) ado, here's the finished product. I LOVE them!!
As per my husband's suggestion I left some of the skulls the way they were painted already. Then I added some hot glue drips to the top and painted them and the base to match, then dripped a bunch of wax on the top to make it look nice and old and used.
I couldn't resist going black on a couple of them, too. Black is so very Halloween, afterall.
Some gray paint dry-brushed onto the black really brought out the details. I went a little crazy with the drippy wax, but I think it looks cool.
I'm making a couple of single-stack candlesticks as well, just for fun. The tricky part now is going to be deciding which color I'm going to keep and which ones will go to Unique Boutiques for sale!
Now, I realize none of you are going to run out to your local dollar store to find some ceramic skulls to turn into candlesticks, but I'm hoping that this post will get you thinking about fun and unique things you can make using inexpensive items that you might come across while you're out and about.
Go ahead- scan that aisle that you never even glance at. You never know what might inspire you!
I'm sharing this project at Skip to My Lou!