Wednesday, July 17, 2013

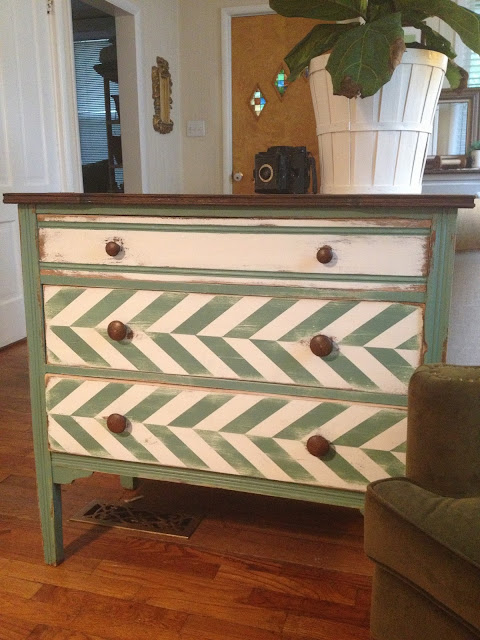
Before and After: Herringbone Dresser

 
Hello, friends!  I hope you're having a good summer!  Ours has been, um, interesting.  It started off pretty good, no big plans, but a few weeks ago we were notified by our landlords that they don't want to continue renting out their house.  We were all set to stay put for another year, but suddenly all of our plans for a relaxing, lazy summer were scrapped and we had to start scurrying to find a new home to rent, plan and execute a yard sale and PACK!
 
So far things have worked out well, but right now I'm home by myself with the 4 kids while the Mr. is in Europe for 2 weeks on a business trip.  And we move two weeks from tomorrow!!  Gah!  LOTS to do, but for some reason I'm not worried.  I know it'll all be fine.  :) 
 
So before I disappear for another month or so to deal with this whole moving thing, I wanted to show you a project I did a few weeks ago that I was really happy with in the end.
 
My inspiration began with a little school chair that I've had sitting around for a while.  I collect these little chairs and my kids love to use them for watching TV and such. 
 
 
The color on the legs of this chair is such a nice grayish green and I thought it would look cute on a painted piece of furniture.  But I had to find a piece to paint!  Luck was with me on a yard sale trip when I came across this old oak dresser that needed some updating.
 
 
Instead of trying to color-match my chair's legs, I just picked the closest paint chip I could find to it and Valspar's Redstone Osgood Green was the winner.
 
 Another thing I've been wanting to try is to paint a herringbone pattern on the drawer fronts of a piece.  This was the ONE!  I carefully taped off my pattern and made sure that the drawers were lined up exactly so the pattern would be consistent when they were put back in the dresser.

After the paint was dry I distressed everything really well and decided to leave the knobs unpainted.

 The top got sanded down and restained with a darker color, and the body of the dresser got painted completely with the green.  The skinnier top drawer I left mostly white but used the green to bring out the carved stripes.


Someday I might give this piece some glaze, but for now I really REALLY like how it looks!  Isn't it snazzy?!  And I have to say, while I'm kind of over the whole chevron craze, the slight off-set design of a classic herringbone pattern still appeals to me!
 
I hope you'll keep tabs on my little blog, even though it'll probably be kind of quiet around here for a while.  Thanks for your patience and have a GREAT summer!!

Wednesday, June 5, 2013

A hexagon quilt for Rowan

I'm sharing a project today that has been in the works for a YEAR.  Last summer my family relocated from California to Michigan.  On the way we stopped to see lots of family and friends, and would often spend several days at each place.  I decided I wanted a project to work on during my down time, so I hit the fabric store while visiting a brother and gathered fabrics for a baby quilt for my youngest.
 
This quilt from the Blueberry Park blog had made a splash on Pinterest and I was immediately in love. 
 
The hexagons, the colors, the patterns on the fabrics, the pop of yellow on the border-- I LOVED it!!  So I basically set out to copy it.  :)  If I could have gotten my hands on the EXACT SAME fabrics she used, I totally would have.  LOVE.
 
By the time we got to Ann Arbor I'd gotten all of my pieces cut, then laid them out in a pattern I liked.

Then it sat in a bag in a closet for many months while I summoned the courage to sew them together.  I was just so afraid that it wouldn't work!  A couple of months ago I decided to just go for it and held my breath that it would turn out.
 
I stitched each little half hexagon to the one beside it, making long narrow strips.

Those strips were then sewn together forming - GLORY BE!- full hexagons!


I decided I wanted to add more interest to the front, so I purchased some of this magnificent faux bois print fabric from my friend at HBFabrics on Etsy, and it was just what I was looking for!

I bought a piece of natural cotton batting, sewed up a backing using some more of the Faux Bois and a cute aqua oval fabric (also from HBFabrics), and brought it along on our trip to Virginia over Spring Break so I'd have something to do in the car.  I've come to really love hand quilting.  It's so relaxing to hand stitch, don't you think?

Joann Fabric carries a lovely mustard colored linen, which became the perfect binding.

This quilt has been done for a little while now, I just kept forgetting to share the finished product!

I mainly quilted on the solid colored hexagons so the stitching would stand out, and chose a different kind of design for each color. 

The strips of Faux Bois on the back were a happy accident, as I forgot to account for shrinkage and didn't buy a big enough piece of the aqua backing fabric.  But I'm so glad it happened this way!

See how I cheated and rounded the corners so I wouldn't have to miter them?  I. AM. A GENIUS!!  Seriously, though, I don't think I'll ever make a square-cornered quilt again.  I love it!!

I have to say, I really REALLY love this quilt.  I get compliments on it whenever it goes out with us.
 
And now this little mister has a Mama-made quilt of his very own.

Friday, May 10, 2013

a little linen coin purse

After nearly 13 years using the same trusty black leather Fossil wallet, I recently decided I was ready for a change.  I snagged an adorable fabric wallet made by a friend of mine, but it didn't have a zippered compartment for my coins. 
 
This, of course, necessitated the creation of a coin purse.  I'm not sure how I came to settle on the design that I did, but after making the decision that I wanted some pretty french knots to adorn my new purse, I chose a graduating assortment of yellow embroidery floss and a scrap of grey linen from my stash.  This was the perfect in-front-of-the-tv project and took me several hours to complete.

I started with the darkest yellow and created a cluster of french knots on my linen.  From there I chose ever lighter shades and just made my way out, scattering the colors a little as I went so there would be no hard lines as they blended together.


I picked up a coin purse frame at Joann, and after checking out a few online tutorials for making these little bags, I cut out my pieces and sewed them together.  Assembling the purse and the frame was a little tricky, but I managed. 

 
The holes along the edge of the frame are so you can sew your purse in, but I chose not to and just used glue instead.  The inside edges are a little sloppy, but I don't care.  ;)

My coins now have a safe, cute home, and that makes me happy.

Monday, May 6, 2013

Handpainted baby leggings, 3 ways

 
Have you noticed the baby leggings craze?  How could you NOT??  They're E-V-E-R-Y-W-H-E-R-E.  And even though there are TONS of adorable baby girl leggings to be found, you can't deny there are some super cute boy designs out there, too! 
 
Since I've got a tiny guy of my own, I decided to board the leggings bus-- just to see.  I spied a simple grey pair at a thrift store one day and decided to jazz them up a little before I went all leggings loco.
 
Lemme show ya what I did.
 
First I gathered my supplies:
craft paint
textile medium
a sponge brush
stencil plastic (not shown)
exacto knife (not shown)
cutting mat
 
Using the stencil plastic and exacto knife I cut out a simple, imperfect chevron design.  The grid on my cutting mat was helpful in getting my lines straight and evenly spaced.

 
Next I slipped a piece of poster board into one leg so the paint wouldn't bleed through.


 Then I got to stenciling!


I made my way around the leggings and eventually my design met up in the back.  It wasn't perfect, but so what? 

I made the lines of the zig zags uneven on purpose because I knew I'd never get a perfectly printed design like you see on store-bought clothing.  So I figured if I made it look intentionally flawed then perhaps my mistakes and flubs wouldn't be so noticeable! (???)

I'm pretty pleased with how they turned out.


Don't worry- he likes the leggings, too.  He just doesn't like photo shoots right before lunchtime.  :)
"Please, Mama!  NO. MORE. PICTURES!!  I just want a flippin' CRACKER!"
 
My brother gave me the idea to make some Lego leggings (Legogings?), so I cut up an old knit skirt I had and stamped it with-- what else?-- LEGOS!

Again I used paint and fabric medium, but this time stamping on flat fabric allowed me a lot more control over how the design came out. (See one of my little Lego stamps in the corner of the photo below?)

Then I sewed them up and there you have it!  Another pair of hand painted leggings! 


 Unfortunately a little tragedy befell this adorable pair.  I forgot to heat set the paint with my iron before they got tossed in the wash, so a lot of my painstakingly stamped Legos faded.  Some quite a bit.  They're still cute and wearable, just not as vibrant as before.  *sigh
 
Here's another pair that's in the works.  Just need to add elastic for the waistband.  This time I drew on my design with a fabric marker. 
 
Sorry these photos aren't very clear.  Rowan has decided that it's hilarious to try running away from me before I can take his picture.  The turkey.


Okay, so now you can see that it is possible to make your very own adorable baby leggings using 3 different methods BUT
what if you don't sew?  What if you don't have the supplies to make these?  What if you the design you want would just be impossible to recreate yourself?  Or what if you just plain ol' don't feel like making them??
No worries.  I got ya covered.  :)
 
 
I happen to know the most affordable and A-FREAKING-DORABLE baby leggings are available at
 
 
Check out just a few of their items:
 
camo
 
wide blue & white stripe

grey and neon
 
ikat 
 (do you recognize this little model?  heehee!)

mustard chevron
 
 grey mustache
 
Most of the leggings I've shown you would be fantastic for boys, but I couldn't resist adding a photo of their precious floral leggings, too.  Seriously, they're my favorite.
 
There are many more designs in their shop, and new designs being listed often.  Go take a peek!  And next time you're out thrifting, keep in eye out for a plain pair of leggings that you can jazz up yourself!