Showing posts with label recycling. Show all posts

Monday, January 7, 2013

Sometimes it's the little things

Last month, like many of you, I was in the throws of Christmas preparation.  Shopping and planning and making and running around.  You know, the usual. 
 
I wasn't making very many things, just a few little gifts like the dolls I shared recently, and a couple of new Christmas decorations.  But I kept having trouble with my projects.  Time after time I'd have to walk away in frustration, only to come back to it later and wrestle with it some more until it was done.  Not much satisfaction to be had.
 
One day it all just got to me.  I was grumpy and frustrated and had just had it!  You know what I mean?  I vented my frustrations on Facebook with this:
 
Today I've struggled with a gloom that's been pestering me. Maybe a mug of cocoa will help. Couldn't hurt, right?
 
to which a sweet friend replied:
 
Christmas music on Pandora, make a craft, get some sunshine. 
(Did I mention that Michigan is very dreary in the winter?  That was part of my problem at the time, too, I'm sure.  Sick to DEATH of the grey!)
 
She didn't know that I'd been struggling with that very thing, but the her idea still appealed to me.  I needed to make something simple but that required focus.  Again, I wanted to use my hands and end up with something successful. 
 
I immediately dove into my craft closet, searching for inspiration.  I spied an oatmeal colored wool sweater that I'd picked up a few months ago while thrifting.  It was in great condition, just shrunken.  Perfect for a craft project!
 
Next I started hunting for buttons.  I wanted big wooden ones, but didn't have enough.  This gave me another idea, so I walked out onto my back porch and rifled through a pile of twigs my husband had stacked next to the firepit.  I quickly found one that I liked and went back inside to start my therapy.
 
I cut the arms off the sweater right at the seams then turned it inside out and sewed it closed on 3 sides, leaving the hem open.  Pillow cover!
 
Next I turned my attention to the twig.  It was fairly straight but still had a few extra knobs that I wanted off, so I used my Dremel tool to clean it up a bit.  Then I cut it into 5 sections that were each about 1.5"-2" long.
 
With a little piece of sandpaper I smoothed each piece, rounding off the ends and giving myself the much-needed handwork that I was looking for.
 
I got the tiniest drill bit I could find and carefully drilled two holes in the middle of each section of twig.  Luckily I'd chosen a piece of fallen branch that was dried out but not rotten.  I was so scared that after all that I'd end up with split, crumbly and broken pieces of twig when I tried to drill into it.
 
But it worked!
 
I made button holes in my pillow cover then attached my new handmade twig buttons.


I cannot tell you how much I needed this project.  I just needed something to go right!  It only took me about an hour (you know how important instant gratification is to me), and to end up with something that I really, truly liked and could be proud of was HUGE. 
 

This project made me realize a few things.
1. My yard is a great resource for project materials!
2. Sometimes something as small as making a button can turn your whole mood (and crafting mojo!) around.
3. There's no need to go spend a bunch of money on supplies when you get the urge to create.
4. Projects don't need to be big, involved or impressive to give you a great sense of accomplishment.

So, Sasha, if you read this, thank you for your suggestion. It made all the difference in my day. And who knows? I may just be making some more wooden buttons somewhere down the road, because now I know I can! :)

Thursday, July 26, 2012

Basic tee upgrade ~ bleach pen

Time for another plain tee shirt upgrade! 

 
You'll need:
  • plain cotton t-shirt in any color
  • Clorox bleach pen (found in the laundry aisle or an off-brand one found at Dollar Tree)
  • white towel or newspaper
  • inspiration image (optional)
Before we get started, I want to state up front that I'm not trying to pass these ideas off as my own, because this is by no means an original idea or project. It's been done and done and done some more. But if YOU haven't seen it done yet, maybe this might just inspire you to give it a try! It's easy, my friend. EASY.

 
First, pick out your shirt.  Mine is yet another fabulous Target tee in my favorite 'boyfriend' style like last time, only this one's gray.

 
Next, choose an image you want to recreate, or come up with one of your own.  Here's my inspiration image that I found online.


I laid my plain ol' boring shirt out flat and placed a white towel inside the tee. (Any kind of protective layer will work, just make sure it's not something you'll be really sad about ruining. We're working with bleach, ya know.)   I knew I wanted my design to go up one side of my shirt and maybe wrap around a little, so I laid it with the seam and a little of the back showing.

 
Next, grab your Clorox bleach pen, SHAKE IT GOOD and go to town!  (I only shook mine a little bit because I didn't want tons of bubbles, but I think you really do need to shake it well. I wonder if I were to shake it better if maybe the bleach wouldn't have bled and I would've gotten a sharper design?)
 The bleach pens have two tips, wide and a fine, and obviously you'll want to use the fine tip for a design like this. 

 
Move quickly so your design is somewhat uniform in color by the time you get done, but if you intend to let your lines turn completely white then no need to hurry.


 There will be bubbles that come out as you draw, but don't worry too much about it.  Pop 'em, blend in the blobs with a toothpick or pencil and move on.  Accept that your finished product won't be perfect and that the imperfections are what make it unique!

 
 Allow the bleach gel to sit for a couple of minutes to pull some of the color out of your shirt, but DON'T WALK AWAY FROM IT!  Keep a close eye on the shirt so as soon as the bleach has done its job you can rinse it off.  Again, if you're going for white lines then no need to fret about how long it sits.  In theory, you could let the gel dry completely.  (In my two attempts at doing this, though, the longer I let my bleach sit the more it bled.  Again, maybe because I didn't shake very well.)
When it's ready, CAREFULLY carry your shirt to the tub and turn on the shower.  Rinse off all of the bleach gel, using your hands to help it come off. 
If you can, throw your shirt into the laundry to finish getting the bleach out.  We were still in the hotel when I did this project so I just used some baby shampoo to wash out the bleach and then laid it out to dry.

 
 I really love that the gray turns sort of a peachy color when it's bleached.  Cool, huh??


Check out these other bleach pen projects I found online.  You could go with a really complex doodle design like this one~
link

 
or a pretty henna design like this~
link

 
or even write words or lyrics on your project, like this one!  I love that she even added some embroidered detail to it!  See the red?
link

 
How about using a bleach pen to jazz up some plain SHOES?  WHAT A GREAT IDEA!
link

 
I'm totally doing this to a baby onesie.  Watch me.
link

 
And you know what?  Who says you have to do a super intricate design?  I'm kind of loving this kids' tee with the simple, happy sunshine face.  Plus, what an awesome way to disguise a stain!
link
Nobody said that your project HAS to be clothes (or shoes), either!
How about:
  • cloth napkins
  • a scarf
  • a tablecloth
  • curtains
  • throw pillows
  • quilt squares
  • a baby bib
  • a baseball cap - pretty much anything!  Just remember when choosing what to draw on that bleach works best on natural fibers. 

 
Have fun bleaching!  ;)

Friday, December 9, 2011

A Recycled Wood Sign and More Christmas!

Like a lot of you out there, I'm still working on getting my home decked out for Christmas. It's not a one-day event for me, but this year it's been happening slowly over the past couple of weeks. I think I'm just about there, now. All that's really left is the clean-up. (Boo.)

While I was in my hall-decking mood yesterday I leaned an old window up behind my computer monitor and, while I really liked how it looked, the wall above it looked kind of bare. It needed something. Something I didn't have already, so what else was I going to do but make that something?

I poked around in my garage and on the side of my house and discovered these old boards that were once the top of this old writing desk that I turned into my kitchen island.

They were perfectly weathered and beaten up, so I didn't do anything to them except sand the grossness off the backs.

I had these little dealies laying around from another project (I'm not even sure what they're called or what they're really for) and used 3 of them to attach 2 of the boards together in the back.


Then using 2 screws and some heavy wire I made a hanger. Betcha can't guess what I made...

Okay, so maybe it wasn't real hard to guess (especially if you paid any attention to the title of this post). This sign required zero painting- just my trusty old print 'n rub technique that I've used over and over again.

Now that gap between the leaning window and the ceiling doesn't look quite so vacant.


Just for fun, I'll give you a spin around our front room to show you some of the other Christmasy things I've got going on in there.


Happy hall-decking to you all!

Monday, November 28, 2011

Christmas crafting

I recently went on a Christmas crafting frenzy so I could stock my space at the shop with some cheerful goodies for those early-bird holiday shoppers. I gave you a sneak peak of some of them in this photo a couple of posts ago.


And today I'm going to give you a closer look.

I've said it before and I'll say it again- I am not terribly original but I can copy just about anything. Most of these projects were inspired by others, so I'll be sharing the links to them so you can try these projects yourself if you want.

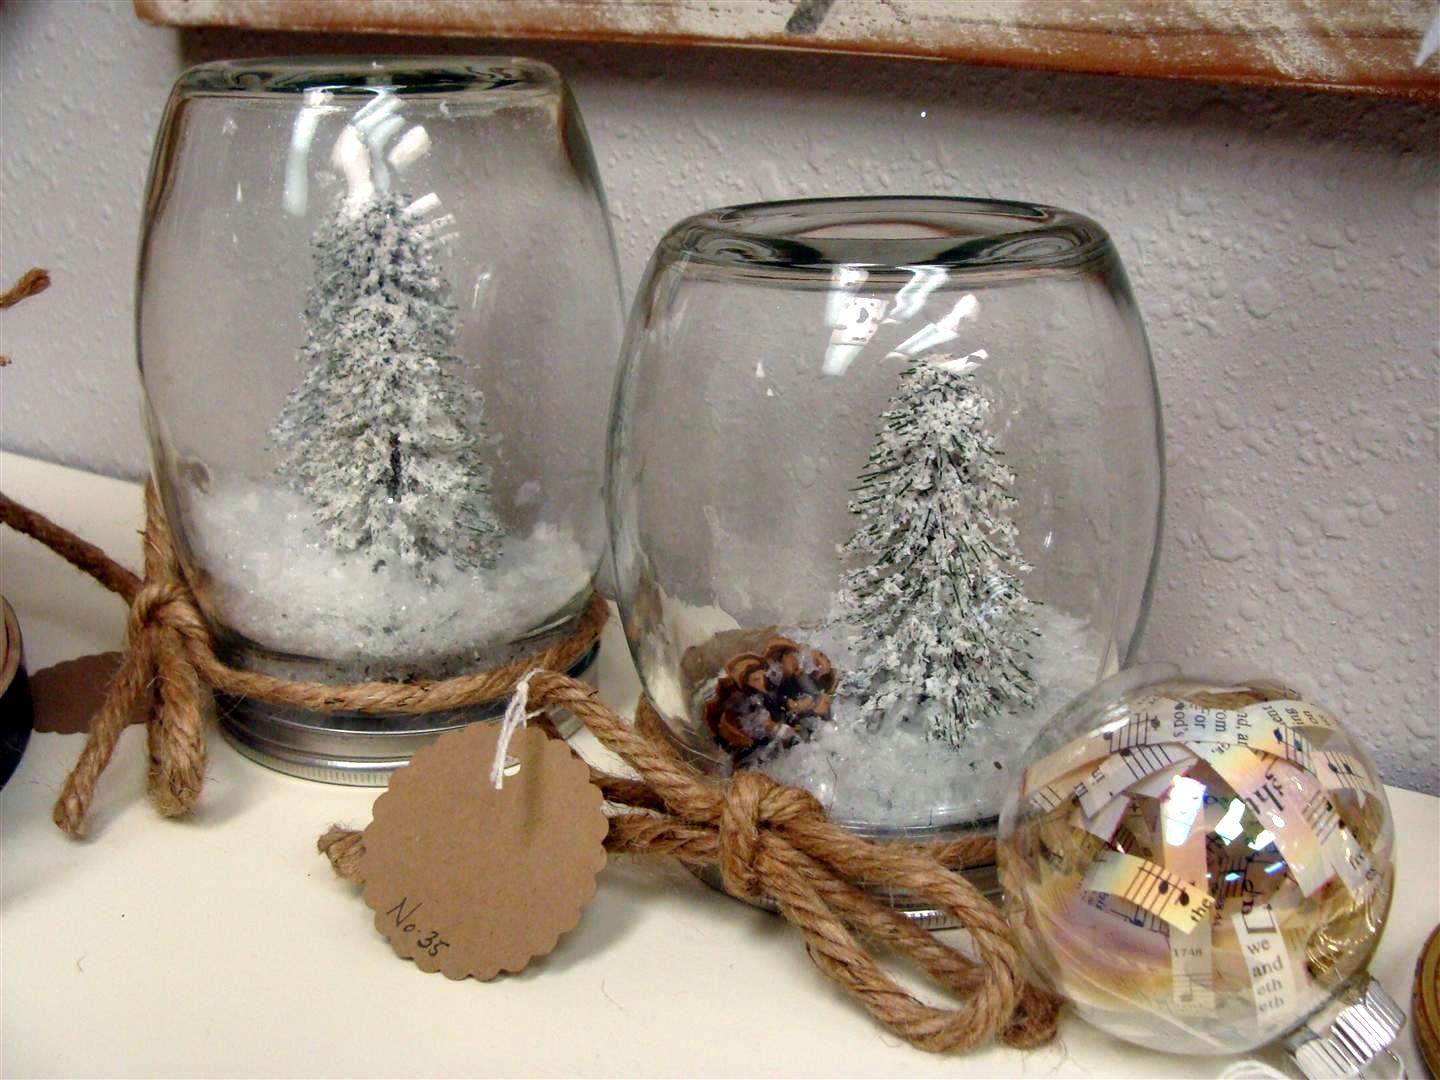
These mason jar snow globes are an Anthropologie knock-off.

I made some more this afternoon and considered doing a full tutorial, but they're just so easy it seemed silly. So if you want to make some, here's a mini-tutorial.

You'll need:
mason jar (mine are from Hobby Lobby)
mini fake trees (got mine at Dollar Tree in a 2-pack with one big and one small)
any other little items you want inside, like mini pine cones
fake snow (any craft store)
glitter
hot glue gun and sticks
ribbon or rope to decorate

Hot glue your trees and other knick-knacks to the inside of the lid. While that dries put a little fake snow and some glitter inside the jar. Place some hot glue along the very inside edge of the top of the lid (where the top of the jar will touch once it's screwed on). DON'T put the glue on the threads of the lid. Carefully screw the lid on tight. Tie on some ribbon to decorate it a little further, shake and enjoy!

Moving on...

I really love old sheet music and have collected quite a few vintage hymnals. I found one recently that had the edges of the pages dyed red, which was perfect for these Christmas crafts. I used it to make some ornaments (inspired by Miss Mustard Seed).


And a couple of nice big wreaths.

These book page trees on timber bases look pretty cute clustered together. (Inspiration found here.) Instead of folding every page like the linked tutorial says, I just cute through the pages with an Exacto knife from the top inside corner to the bottom outside corner (or an inch or so in from the corner for a skinnier tree). Each tree also has a skewer glued inside the binding, which fits into a hole that I drilled into the base. That way the trees can be more secure on their bases for display but can come apart for storing.

Here's a closer look at the candles like in the photo above. The possibilities for these are endless! (Tutorial found here.)

Remember my thrifty finds from this post? Here's what I did with them.

These silver pieces were pretty cute as-is, but they got a little polish before going into my space at the store.

Did you know that plain old white toothpaste is a pretty good silver polish? That's what I've used on the last few pieces of really tarnished silver that I've cleaned up and it works great! Just smear it on, let it sit then, wipe it off with a clean, dry cloth.

This artichoke finial just needed a little spruce.

So I painted the base of it a creamy white, glazed and distressed it and then used some Antique Gold Rub 'n Buff on the center designs.

I forgot to take an "after" photo of the gold candlestick in the photo below, but it also got painted creamy white, then glazed and distressed. For now I'm keeping the silver photo holder.

The wooden box got some new rope handles and some lovely French typography on the side. (Oh, and there's that newly polished bud vase next to it!)

The typography was an image from The Graphics Fairy (of course) and I used my tutorial to transfer the image onto the wood.

I have to admit, even after all that Christmas crafting, I'm not really in the Christmas mood yet. It's after Thanksgiving and I have no desire to pull out my Christmas decorations. I hit a thrift store today and found a few boxes of vintage ornaments that prompted the cashier to ask me if I was setting up my tree this weekend. I felt kind of silly when I said no.

Still, I listened to Christmas music on my Pandora station while making snow globes. Hopefully the mood strikes soon! Are you in full-blown Christmas mode yet?