Monday, January 23, 2012

Before and After: Chevron Desk/Vanity and Vintage High Chair

What would you call this? A desk or a vanity? I don't know. One day while I was thrifting it caught my eye. However, the price tag turned me off so I walked away without it. I kept thinking about it and because I knew the store regularly puts its furniture on sale (one random day a week), I swung by daily until it was on sale for 40% off- THEN it came home with me! Luckily nobody else grabbed it in the meantime.

The veneer on top had some cracked and bubbling areas, so before I did anything else I cut those sections out with an exacto knife, filled them in with wood filler then sanded it smooth.

It's been kinda cold here lately so I haven't been spray painting but have had to hand paint in my garage. Lucky for me I've stumbled across a lot of good mistints of Behr's Paint-and-Primer In One at Home Depot, which cuts down a lot on the time it takes to hand paint a piece of furniture.

It took THREE COATS to cover this silly desk in white. I had lots of fun painting the drawers with some cool stripes and chevron pattern.
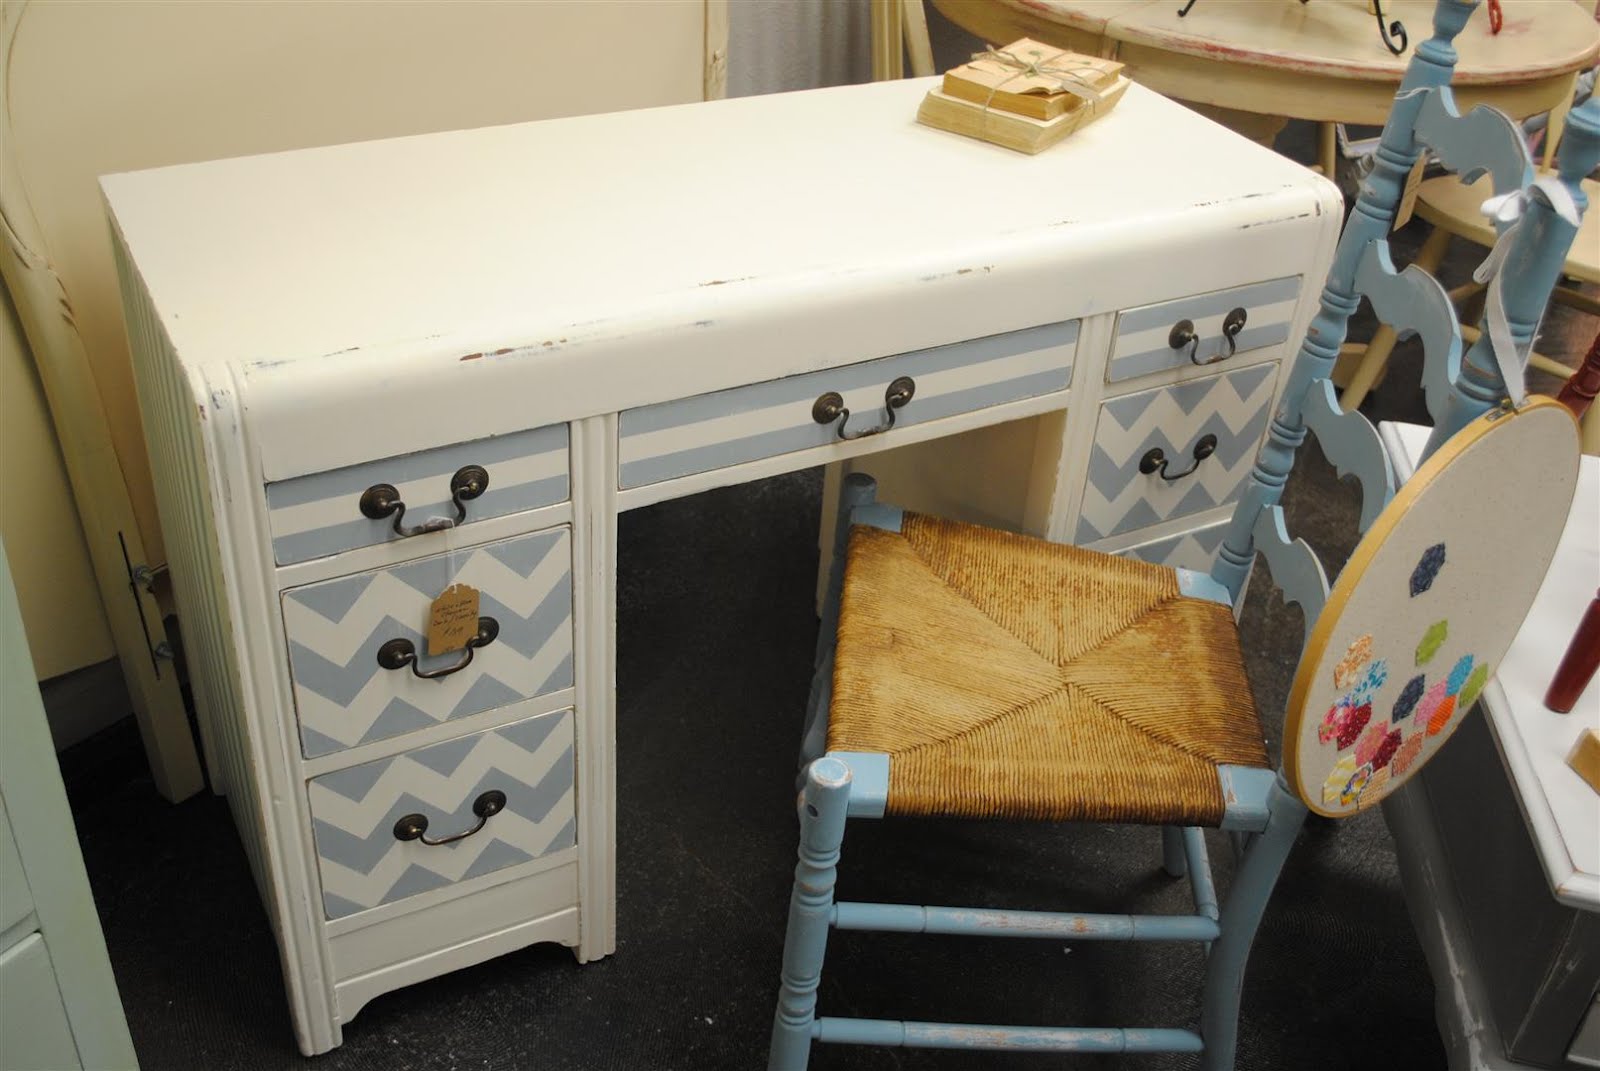
You can see in this photo that I also painted the side panels with stripes.

I roughed up the whole thing a little with some sandpaper and kept the hardware as-is. The insides of the drawers also got a facelift with some pretty contact paper on the bottoms (they were gross). I'm still on the hunt for a cute little chair that I can pair with this, but we'll see if maybe it sells without one first.

I couldn't resist this simple wooden high chair. It reminded me of the one I bought for my son a couple of years ago. It was in pretty good shape, but needed a little love.

One of the mistints I picked up recently was this perfect shade of red. It's not too bright and it's not too dark. I LOVE it.

Now THAT'S a cute high chair! :)

Wednesday, January 18, 2012

pillows, pillows, pillows

I don't know about you, but I have a hard time decorating for Valentine's Day. I just don't go in for all the sparkly hearts and pink and fluff. Yes, I'll use red and hearts here and there, but sparingly and in an understated way.

However, in an attempt to make my house somewhat festive for the upcoming holiday (and because I couldn't keep my Christmas pillows around until spring), I decided to sew up some new pillow covers for my couch.

This lumbar pillow cover was made using a red and cream ticking stripe and a piece of drop cloth that I had. I bought the wood buttons on Etsy like 3 years ago or so, but waited to use them for just the right project.

I'm sure you've seen doily pillows popping up everywhere, so how could I resist making my own? I found half a dozen of these nice big doilies at my local thrift store and used dollar store cotton napkins for the cover. These are pretty easy to make. Just dot the back of the doily with some fabric glue to adhere it to the fabric, then once that's dry stitch around the edge and a couple of places in the middle to keep it secure. I think they look kind of romantic in a way.

This afternoon while my littlest one napped I whipped up this last cover from scraps in my stash. Once again the red ticking appears, along with some more taupe napkin fabric.

I really like how this one turned out, and it's definitely got more of a Valentine's Day vibe than the others.

The letters are just appliqued on with a small zig-zag stitch on the top layer and a straight stitch for the bottom layer. That taupe fabric is going to fray some over time, which is what I want.
Although... now that I'm looking at it from a distance, I wish I'd tipped the "o" the other direction. Dangit!

I've got one more chair needing a new pillow cover, which is in the works. But I'm afraid it's going to take a little while to finish. Hopefully before Valentine's Day actually arrives! I'll be sure and share as soon as it's done.

Tuesday, January 17, 2012

Valentine's Day Button Art

Do you ever get the urge to just make something, but you're not sure what? That happens to me every once in a while. Sometimes when I'm bored I just want to sit down and make something. Something easy, fast and satisfying. This happened to me the other day and, as luck would have it, I was able to gather up what I needed around my house to make a little Valentine's Day craft.

It took less than an hour and turned out pretty cute, if I do say so. All it took was an old frame (painted and distressed), fabric, hot glue to attach the fabric to the frame's backing, white glue, buttons and brads.
This little button art project was inspired by the monograms on canvas that my kids made for their teachers as Christmas gifts (tutorial found here).


I loved the first one so much that I ended up making another one. This one may go to my space for sale pretty soon.

Have you done any cute and easy Valentine's Day projects lately? I hope to have a few more to share soon!

Saturday, January 7, 2012

Before and After: Ladderback Chair and Twin Bed

Sorry things have been so quiet around here lately. I'm counting down to Delivery Day with baby #4, and these last few weeks seem to be going really slowly. As my belly gets bigger working on furniture becomes more and more difficult, and with the holidays in there I had plenty of other things to keep me busy.

But enough of the excuses. I'm determined to work on furniture for as long as I possibly can, and I've managed to get a couple of little things done lately that I wanted to share with you.

I love a cute ladderback chair, don't you? This one had a rush seat that was in good shape but kind of worn, so I left it alone and just painted the wood.

I primed it, then painted it with a nice flat blue mistint paint that distressed really well.

I think the roughed up paint and the worn woven seat now somehow work together to make this chair pretty sweet.

This vintage twin bed was a total steal at a yard sale this summer. I hated to paint over that pretty birdseye maple, but it wasn't in great shape and I didn't have it in me to refinish it.

Besides, the real eye catcher of this piece is that heavily carved headboard, which paint could only enhance.

All it needed was a fresh coat of ivory paint-and-primer (also a mistint that I picked up) and some brown glaze to bring out the details.

This project was perfect for glazing. Just look at how that carving stands out now!
I just brought both pieces to my space at Unique Boutiques (which admittedly has been looking rather bare since I've slowed my pace) and hope to have another couple of things to bring in this week as well.

If you're local be sure and go check it out! We're at 180 Leveland in Modesto, at the corner of Floyd & McHenry behind the Chase Bank.

Monday, December 19, 2011

Teacher Gifts: Button Monogram on Canvas

My kids got out of school for winter break on Friday, and sometime on Tuesday I realized that I hadn't come up with anything for their teachers' gifts yet. Pinterest to the rescue!! I knew I wanted something personal, handmade, easy, inexpensive and (preferably) non-edible.

When I came upon this photo, I knew what our project was going to be. I mean, how stinkin' cute is this framed button monogram?

After searching around town for some inexpensive white frames with mats and coming up empty, I opted to go with plain white canvases instead. I picked up a 2-pack at Hobby Lobby for about $6 (but used my 40% off coupon to get them for even cheaper).

I already had a pretty good stash of buttons, but just in case I also bought a couple of packs of assorted colorful buttons at Joann and some colorful brads at Hobby Lobby.

Using simple, thick fonts, I printed my kids' teachers' initials and used the trusty pencil-on-the-back-of-the-paper technique to trace the outline onto each canvas.

From there the kids and I pretty much followed Jen's tutorial for filling in the letters with buttons, brads and snaps, starting with big buttons first and working our way down to the tiny fillers.

I had them use plain old white glue on each button and they stayed on perfectly once they dried. For the brads, I ended up clipping off the prongs on the back with wire cutters and gluing them on because I didn't want to fool with trying to poke them through the canvas.

Didn't they turn out great? This is my 5-year-old's masterpiece (with some help from Mom with the tiny ones).

And here is my 8-year-old's work of art.

I loved that they did most of the work themselves, and they loved having creative control to choose the shapes, sizes and colors of materials that they wanted to use and configuring them how they saw fit.
And I'm pretty sure their teachers loved them, too!

Wednesday, December 14, 2011

Before and After: Maple Dresser/ Sideboard

This maple dresser started out pretty plain-jane, but sturdy. It was a steal of a deal from Craigslist but it took a while for it to "tell" me what it wanted to be.

In the end we went with a heavily distressed duck-egg paint job with distressed white hardware. (And please forgive the sloppy Photoshopped background, but I figured that was better than showing you all the crap that was surrounding this thing when I took the picture.)


I just love how the top turned out after I sanded it.

Wouldn't this look so cute in a nursery as a changing table?

Seriously, I do love these kinds of dressers. I've lost track of how many have come in and out of my garage now, but this surely won't be the last one!

Friday, December 9, 2011

A Recycled Wood Sign and More Christmas!

Like a lot of you out there, I'm still working on getting my home decked out for Christmas. It's not a one-day event for me, but this year it's been happening slowly over the past couple of weeks. I think I'm just about there, now. All that's really left is the clean-up. (Boo.)

While I was in my hall-decking mood yesterday I leaned an old window up behind my computer monitor and, while I really liked how it looked, the wall above it looked kind of bare. It needed something. Something I didn't have already, so what else was I going to do but make that something?

I poked around in my garage and on the side of my house and discovered these old boards that were once the top of this old writing desk that I turned into my kitchen island.

They were perfectly weathered and beaten up, so I didn't do anything to them except sand the grossness off the backs.

I had these little dealies laying around from another project (I'm not even sure what they're called or what they're really for) and used 3 of them to attach 2 of the boards together in the back.


Then using 2 screws and some heavy wire I made a hanger. Betcha can't guess what I made...

Okay, so maybe it wasn't real hard to guess (especially if you paid any attention to the title of this post). This sign required zero painting- just my trusty old print 'n rub technique that I've used over and over again.

Now that gap between the leaning window and the ceiling doesn't look quite so vacant.


Just for fun, I'll give you a spin around our front room to show you some of the other Christmasy things I've got going on in there.


Happy hall-decking to you all!