Monday, July 23, 2012

Basic tee upgrade ~simple embroidery

I've developed a crush on Target's line of Mossimo tees. *sigh* They're cute, soft, nice and long, have a flattering feminine fit without being too snug, come in lovely colors and are CHEAP! Not "cheap" like, they're gonna fall apart after three washes cheap, but super inexpensive. Like, $6-$10 cheap. LOVE IT.

But, they're plain. This isn't necessarily bad, but I find myself wanting to fancify them a little. The other day I was browsing my Google Reader blog list and came upon this post by Eve over at evieivyoverstreet.

First of all, Eve and I are kindred spirits.  She's the crafty kind who loves thrifty goodness as much as I do, AND we both have 3 sons, one of which is named Finn!  We've even traded our crafts before.  Cool, girl, that Eve. 

Okay, back to the post.  Eve wrote about how she awesomeized a plain thrifted tee with a few notions that she had on hand.  While I didn't have any plain thrifted tees that needed some love, I did have a beloved Target tee or two that I felt could use some umph. 

Exhibit A.

Off to the craft store I went and picked up a skein of yellow pearlized cotton.  (You could also use embroidery floss for this, by the way.)

I plopped down in front of the TV that evening and during a few episodes of House Hunters on HGTV I added some pizazz to my previously plain pullover.  (Alliteration!  Love it when that happens.)

I stitched a couple of rows of running stitches along the neckline, some X's on the pocket...

...and some zigzags on the sleeve and hem.

Nothing too dramatic, but definitely more interesting than before!

Thank you, Eve, for the inspiration.

I have another tee shirt project coming up that was also inspired by her adorable tee, so check back soon! And be sure to pop into Eve's Etsy shop and see all the vintage cuteness she has for sale in there.

Thursday, July 19, 2012

Art from a hotel room

Instead of spending this week in our little apartment in Ann Arbor, the kids and I made the drive to Manteno, Illinois to be with my husband.  That's where he's working for the time being.  The upside to this little trip is that we get to see Daddy everyday (as opposed to Thursday night to Monday morning), but the downside is having to hang out in a hotel room all week.  With four little kids.  With no car. 

Yeah.  Pretty boring.

The kids entertain themselves with TV and Xbox games (I know, I know, a lot of brain rotting is going on), coloring and drawing, doing pages in some workbooks I bought them and annoying each other, while I get to, um, ...uh .... what do I get to do?  Referee, check Facebook a dozen times a day,  read blogs, change diapers, pin to my Pinterest boards, nap.  Yep.  All of those things.  But I need stimulation!  I need a creative outlet!  I need to CREATE! 

Okay, maybe that's a tad dramatic.  But when my mister suggested that we go to the local Hobby Lobby to find something for me to do, I was all over it. 

Here's what I picked out.

A pad of watercolor paper, a set of watercolor paints and inexpensive brushes.

And here's what I did with them.


I am not an artistic painter.  I've painted before, I took a painting class or two in college (I was an art major after all) and I even took a watercolor class but dropped it before I got very far.  I've just never really felt comfortable with it. 

That said, I had a surprisingly good time with my watercolors.  Granted, my subject matter was simple.  How much simpler could you get?  But since I didn't really know what I was doing, I wanted to start off easy.  This let me truly enjoy just playing with the paints. 

I thought I'd get frustrated when my paintings didn't turn out very well, but instead I just let my mistakes happen and tried to learn from them.  The mistakes made me more excited to try again. 

It's been a really long time (too long) since I've sat down and done something artistic, just because I felt like it.  And despite the unremarkable results, I'm so very glad I did.

Monday, July 16, 2012

in the works

Call me crazy, but I lugged my sewing machine across the country with me. I knew I'd want to sew/craft/create even though our household is in storage, so my trusty Singer made the trip in the back of the car.  And my glue gun, too. :)

I started on a project while we were in Salt Lake and have made a little progress on it. Can you guess what it is?

Okay, not a hard riddle to solve.  I'm going to (attempt to) make a hexagon quilt for my littlest little.  I found inspiration on Pinterest with this quilt.


Isn't it FANTASTIC?!!  The fabrics on this quilt are far and away cuter than the ones I was able to find, but it's okay.  I may just have to find an adorable mustard fabric to back mine with as well.

The projects and posts are going to be few and far between for a while, until we can find a house to buy and move in.  But I'll keep you updated with anything I start on. 

Be patient with me, friends! 

Monday, July 9, 2012

Something a little different

Now, I realize that you dear readers of mine usually come here looking for furniture redos, some thrifty treasures or maybe the occasional craft project that I share.  But today I don't have any of those things for you.  Life in a temporary 2 bedroom apartment with all of my stuff in storage isn't exactly the most inspiring or craft-conducive environment. 

Sooo... I thought I'd put together a post that's a little, um, different this time.

Do you like knowing what beauty products other girls are using?  I do!  I'd much rather try out a product based on the referral of someone I admire rather than just randomly picking something up off a store shelf, or relying on advertisements to give me suggestions. 

Today I'm giving you a peek inside my makeup bag, er, basket.  These are the items I use on a daily basis.  I don't use expensive products, so most of these things can be found at Wal-Mart or Target.


Okay, now for a closer look. (And sorry for the lousy photos.  Taking pictures in the bathroom wasn't a bright idea.)

1. Garnier Skin Renew Anti-Dark-Circle Roller
2. Maybelline Instant Age Rewind in Fair
3. Bare Escentuals Max Coverage Concealer brush
4. natural bristle blush brush (Etsy.com)
5. Bare Escentuals Flawless Face brush ~ this is what I use to apply my loose powder
6. clean old mascara wand ~ I use this to brush my eyebrows into shape before filling them in with #7
7. Cover Girl pencil in Henna
8. L'Oreal Voluminous Original mascara in Black
After reading this article on Elle.com with make-up tips for redheads, I converted to black mascara & eyeliner instead of espresso.  Still not convinced I can pull off a red lip, though...
9. e.l.f. shadow brush ~ Oops!  Not in this photo for some reason!  Oh well. I love these $1 items that Target carries!
10. Cover Girl Perfect Point Plus Eye Pencil in Black Onyx ~ My hand isn't steady enough for liquid liner, so I've used this stuff for ages.


11. Cover Girl bronzer ~ This is a new product for me.  I used the same pot of Nicole Miller bronzer for YEARS until it finally ran out last month. 
12. Love & Beauty blush by Forever 21
13. (below)
14. Bare Escentuals Baby Buki brush ~ I use this brush to apply bronzer
15. Sephora Kabuki brush ~ I started using Bare Escentuals about 6 1/2 years ago and am still using 2 of the 3 brushes that came with my starter set.  I did end up replacing the large Kabuki brush with this one because it got the most use applying my foundation and wore out the quickest.


13. L.A. Colors eyeshadow set in Trendy (shown) & Traditional (not shown) ~ I use this eyeshadow all the time and it came from -get this- the DOLLAR TREE.  For reals.  Love it.  The quality is better than you'd expect from dollar store makeup, and the colors are lovely, natural and earthy with a hint of shimmer.


21. e.l.f. eyeshadow set ~ You can buy the empty mirror compact and little magnetized eyeshadow pots separately at Target.  The colors I have from left clockwise are "moondust" (my FAVORITE), "ivory", "aubergine" and "wheat".  The sponge applicator it comes with is crap, so grab a #9 to apply these shadows instead.
My eyeshadow routine is simple.  Solid color all over the lid and above the crease then ivory on my brow bone and inner corner.
Blam.
I'm wearing "moondust" in the photo above.  It's the perfect shade of shimmery taupe and is just a really versatile color.


16. Cover Girl Trublend Minerals loose powder in Translucent Fair ~ I use this in place of Bare Minerals Mineral Veil, mainly because it's far less expensive, though Mineral Veil is fabulous.
17. Nicole Miller eyeshadow duo (not in photo above)
18. Bare Minerals Matte SPF 15 Foundation in Fairly Light ~ ♥
19. Q-tips - need I elaborate?
20. Visine drops -  you'd be surprised how weary even a little eye redness can make you look.  Get rid of it!
21. Bonne Bell Dr. Pepper Lipsmackers (not pictured)~ I accidentally washed the stick that usually lives in my makeup basket, but remember my Favorite Things post from a while back?  I definitely can't do without this stuff.

And there you have it!  So, what are your tried and true makeup products? 

I'm still hunting for something to deflate my under-eye puffiness.  And please don't say 'a good night's sleep'.  I have an infant, remember?  I need to cheat!  :)

Thursday, July 5, 2012

We're here!

Greetings from Ann Arbor, Michigan!! We made it! We got here 3 days ago after being on the road for over a month and BOY am I glad that trip is done! Don't get me wrong, we had a fantastic trip. We got to visit friends and family, see some places we've never seen before and generally had a really good time. We had no car trouble, no illness, no getting lost and no catastrophes whatsoever.  (That's pretty darn miraculous if you ask me.) But travelling in a car across the country for a month with 4 little kids can get a little, um, tiring.

Don't worry, I didn't do it all by myself. My husband was with us at all of our stops, and even drove with us from place to place a few times. But he still had to work so he flew in and out of wherever the kids and I were and could only spend weekends with us.

For the longer legs of our journey that Aaron couldn't be there for, I recruited my Dad to drive us. He's a true road warrior and had gotten the itch for a road trip, so he was pretty stoked to get to spend a couple of weeks seeing some beautiful country and hanging out with me and the kids. And quite honestly, he was a total life saver. I could never have made it from Utah to Kansas on my own (at least not with my sanity intact), and having some one-on-one time with him during those long days in the car was lovely. He also helped out a ton with the kids along the way. He's what I consider the perfect Grandpa. He's fun and silly and all of that good stuff for the kids, but he's not afraid to lay down the law when it's necessary, either.

Just for fun, here are a couple of maps that (generally) plot the course we took from Modesto, California to Ann Arbor, Michigan. The purple dots are where we stayed for visits, with the yellow line being our route to each place.


We started in Modesto then made visits with friends or family in the following cities:

Windsor, CA
Caldwell, ID
Idaho Falls, ID
Salt Lake City, UT
Kanab, UT
Mora, NM
Kansas City, KS
Libertyville, IL

It was quite a trip, to say the least.  We're settling into a little furnished two bedroom apartment that my husband's company lined up for us in Ann Arbor.  We'll spend the next 8 weeks here while we look for a house to buy.  I'm not sure how many more posts I'll be able to do for the next little bit, but if I come up with something I'll be sure and share.  So check back occasionally, ok?    Sorry for the absence!

Monday, May 21, 2012

Several "before" and "afters"

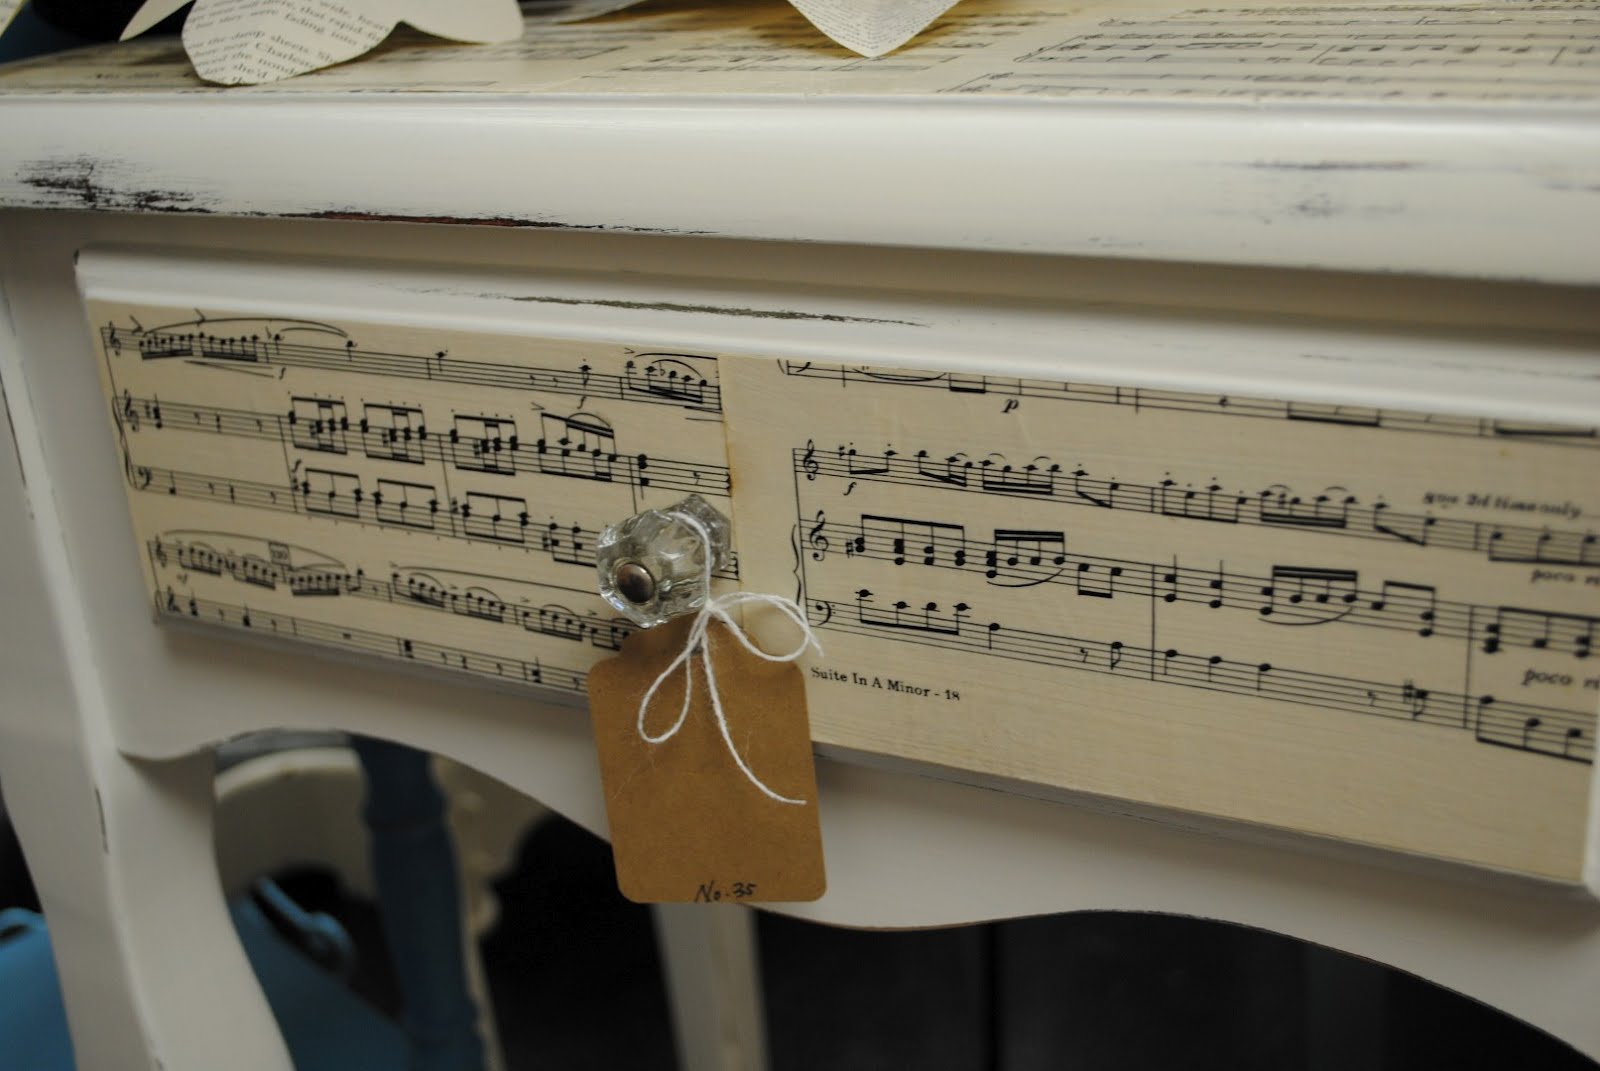
Okay, folks, moving day is the day after tomorrow, so I'm afraid I'm just going to have to dump a bunch of photos on here and call it a blog post. After that I'm going to be MIA for a while. Probably a long while. If I were more on top of things I'd have written a bunch of posts ahead of time and set them to auto-post during my absence, but I think we all know that that was pretty unlikely to happen. And I have to warn you that these are not the most dazzling makeover projects, either. But I did document them (sort of) so I feel compelled to share. First is my husband's nightstand. I decided I'd like to get new ones when we move so I wanted to try redoing this one to sell. It wasn't awful, but I was kind of over the dark brown/painted detail combo.


The top had some water damage so I needed to sand that down before painting.
I painted it a creamy white color, distressed just a bit and added some vintage sheet music to the top and drawer front.
A clear, vintage glass pull adds a little sparkle to it.
Unfortunately I didn't take a "before" photo of this vintage phone stand, but it wasn't much different except it had a shabby looking cherry wood finish on it.  I painted it the same color as my plank-topped sewing table to make it a little more fun. 
These antique chairs were from an ice cream shop in downtown Modesto.  The chairs themselves were in pretty good shape, but they needed an update.
I spray painted them in Heirloom White then got to work on the seat cushions.  A couple of them were missing their seats, so after cutting new plywood circles I recovered them all with simple but sturdy drop cloth fabric. 
Still too plain, though.  They need numbers!  Numbers are always cool, right?  Again using contact paper I cut out the numbers in the style that I liked and rubbed them onto the fabric.  (I did this step after upholstering the seats because I knew that trying to center each number perfectly on the seat and then attaching the fabric would be really tricky.)

Using a stencil brush I dabbed on some craft paint to fill in each number.
I was going for an imperfect look, so I didn't fill them in completely.
Why I didn't take a picture of all 5 I can't figure out.  But I think you can get an idea of what they ended up looking like.
Finally, I painted this little nightstand to match my daughter's dresser.  No distressing, no glazing, just a good paint job.  (Sorry, no "before" for this one either.)
Unfortunately the dresser sold without the nightstand (yes, I sold my girl's dresser- poor thing has had her clothes in laundry baskets for weeks).  But hopefully somebody likes the nightstand enough to buy it on its own!
Well, that pretty much does it.  I have a couple more projects that I'm finishing up now, but I don't know when I'll get a chance to share them.  In the meantime, wish us luck!  This is a BIG move and I'm more than a little nervous about it.  But I hear Ann Arbor is nice, however far away it may be from our loved ones.  I'll check back in as soon as I can.  Please don't give up on this little blog of mine!  I'll be back!

Monday, May 14, 2012

Before and After: Black Numeral Dresser

Holy smokes, people, I've been a painting fool lately!  Seriously, I thought I'd given myself carpel tunnel for about a week. Believe it or not I AM working on projects, despite the fact that I've been a little scarce around here.  I'm not sure if I've mentioned this or not, but we're moving from California to Michigan this month.  We're about to say goodbye to our friends and family here, as well as all of our stuff.  It's going to travel to MI and sit in storage while we do a month-long road trip to see friends and family in Idaho, Utah and New Mexico. We'll get to Michigan around the end of June/beginning of July and live in corporate housing while we search for a house.  That's going to be a whole other ridiculously cuh-RAZY experience in itself, I'm sure.  Meanwhile, I've got movers coming in a week and a half and furniture in the garage that needs to get OUT and into the store to SELL-- pronto! 

So here we go.  This is my most recently completed project and one that I'm really happy with.
I vowed a while ago that I couldn't acquire anymore pathetic furniture to rehabilitate, seeing as how we're moving and all, and my garage already had quite the collection. And I did good!  I stayed away from thrift stores (at least the furniture section), I didn't go to a single yard sale, and I completely ignored Craigslist. It was TORTURE! Then one day I innocently wandered through the furniture aisle of a thrift store, thinking there's no way I could be tempted to buy anything with our move looming so close- until I spotted this.
It's no secret that I have a soft spot for long, low dressers. Perhaps you've noticed.  
There was the grayish blue french dresser...
...and the monochromatic striped one...
...and my favorite robin's egg blue rustic one...
...and the creamy white dresser with the big golden damask...
...and the super distressed blue one that I did for a fellow vendor at the store.

 This one was about as pathetic as they come, and it was priced reasonably and these things usually sell fairly quickly.  Obviously, I HAD to buy it.  I have to admit, I felt pretty sheepish when I admitted to my husband that I'd bought another big dresser. But I had a plan, and that plan came together beautifully on this piece! I started by removing those weird drawer pulls. I considered keeping them until I noticed one was missing, so they had to go.
The holes got filled in with wood filler and then sanded smooth.
The plan for this dresser was a lot like what I did to this numeral waterfall style dresser from a while back. But instead of staining the numbers after the paint was applied, I did the staining first this time. I decided where the numbers would be on each drawer, then stained that little section dark and let it dry.
While the stain dried I painted the body of the dresser with some black DIY chalk paint.
Using an exacto knife and contact paper, I cut numbers in a style that I liked and carefully applied them in the stained sections, being sure to rub the edges really well to prevent seepage.
Then it was time to paint the drawers. The absolute BEST part is peeling up the contact paper and seeing those crisp, warm wood numbers underneath the paint! I distressed everything a bit, then drilled some new holes for rope drawer pulls and wiped the whole thing down with satin polyurethane.


The insides of the drawers are a little funky, some covered with a bright yellow lining and some with a black and white damask.

Wouldn't this be cool in a boy's room? Or as a sideboard in a bachelor pad? Oooh, or even as an entertainment center!

I'm telling ya, watch out for this style of dresser. They can do so much more than store your clothes!